

Ombré Graduation Cake: A Stunning Layered Celebration for Milestones
Graduation season is a time to honor achievements, mark new beginnings, and—of course—celebrate with show-stopping desserts. Enter the Ombré Graduation Cake: an iconic, visually stunning centerpiece that perfectly captures the joy and vibrancy of graduation day. Whether you’re celebrating a high school diploma, a college degree, or any hard-earned milestone, this eye-catching cake elevates the moment and creates memories that last long after the last slice is gone. With artfully blended colors that transition elegantly from light to dark and delicious, creamy white buttercream that’s as decadent as it is gorgeous, the Ombré Graduation Cake dazzles both on the dessert table and across your social feeds. If you’re ready to wow your guests and make your graduate feel extra special, this step-by-step recipe will guide you through crafting the ultimate celebration cake.
Why You’ll Love Ombré Graduation Cake
- Adds a “wow” factor to any graduation party
- Customizable colors to match school hues or personal style
- Rich, classic buttercream flavor loved by all ages
- Impressive ombré technique is easier than it looks
- Perfect for making lasting photo memories
- Ideal for both amateur bakers and intermediate decorators
Ingredients for Ombré Graduation Cake
Creating a picture-perfect Ombré Graduation Cake starts with choosing quality ingredients. Here’s what you’ll need:
- 3 to 4 layers of your favorite cake (vanilla, chocolate, lemon, or funfetti all work wonderfully)
- 6 to 8 cups unsalted butter, softened (for a large amount of buttercream)
- 8 to 10 cups powdered (confectioners’) sugar
- 1/2 cup whole milk or heavy cream, at room temperature (adjust for consistency)
- 2 tablespoons pure vanilla extract (or your favorite flavoring)
- Pinch of salt, to balance sweetness
- Gel food coloring in graduating shades (choose 3 to 5 hues that blend beautifully or match your graduate’s school colors)
- Colorless gel food coloring, if you want pure white as a base
- Optional: Sprinkles, edible glitter, or graduation-themed cake toppers for extra flair
- Parchment paper (to line your pans and for easier cake removal)
- Non-stick spray or butter and flour (for preparing pans)
Every ingredient—especially when it comes to the buttercream—matters when you’re building layers of luscious, stable color. Opt for high-quality butter and pure vanilla for the richest flavor and smoothest finish.
Necessary Tools
Tools can make or break your ombré cake-decorating experience. Here’s what you’ll want on hand:
- 3 or 4 round cake pans (depending on the number of layers)
- Several spatulas: one offset spatula, one straight spatula, and at least two additional (plastic or silicone recommended for buttercream)
- Large mixing bowls (for dividing and coloring buttercream)
- Sturdy stand mixer or hand mixer (creaming butter and sugar to the perfect texture is key)
- Cake turntable (for smooth, even frosting application)
- Bench scraper or cake smoother (blending those ombré bands seamlessly)
- Piping bags, if you wish to create textured rosettes or special finishing touches
- Cooling racks (for even cooling of cake layers)
- Toothpicks or wooden skewers (for testing doneness and for blending colors, if desired)
- Ruler or cake leveler (ensures uniform cake layers)
With these essential tools, even intermediate home bakers can create a polished Ombré Graduation Cake that looks as spectacular as it tastes.
Ingredient Additions & Substitutions
One of the joys of the Ombré Graduation Cake is its adaptability. While our basic recipe covers the essentials, there’s plenty of room for creativity and accommodating dietary needs:
- Cake Base Flavors: Vanilla and chocolate are classic crowd-pleasers, but don’t be afraid to go bold! Try red velvet for a pop of color, funfetti for extra cheer, or lemon for a tangy twist. Gluten-free and vegan cake layers can work perfectly—just choose sturdy recipes that hold up well to stacking and frosting.
- Butter Substitutes: Dairy-free butter alternatives (like vegan baking sticks or high-quality margarine) can replace unsalted butter 1:1 for plant-based celebrations. Keep in mind that this may slightly affect frosting texture—whip extra-long for maximum fluff.
- Milk and Cream: Swap dairy milk with plant-based options such as almond, oat, or coconut milk. Just make sure to use unsweetened varieties to control sweetness!
- Sugar: Powdered erythritol, monk fruit sweetener blends, or organic powdered sugar can stand in for traditional confectioners’ sugar. Some alternatives may affect the buttercream’s taste or texture, so taste-test as you go.
- Coloring: Gel food coloring is preferred for bright, vibrant, and non-watery results, but natural food colors (like beet, spirulina, or turmeric powders) can be used for a more natural cake. Be sure to check ingredient labels to match dietary preferences—some food colors are not vegan.
- Extracts: Customize the flavor of your buttercream by adding almond extract, lemon zest, orange oil, or even a hint of espresso powder for grown-up appeal.
- Add-Ins: Stir in mini chocolate chips, citrus zest, or crushed freeze-dried berries to the cake batter for bursts of color and flavor.
- Decorations: Finish with edible gold leaf, sparkling sugar, piped rosettes, or chocolate shards for extra pizzazz. If you want to personalize, spell out your grad’s name or accomplishment atop the cake with fondant letters or piped buttercream.
These substitutions and additions ensure your Ombré Graduation Cake is tailored to your celebration, taste, and dietary needs—without compromising on presentation or flavor.
How to Make Ombré Graduation Cake
Making your own Ombré Graduation Cake isn’t just a baking project—it’s a creative adventure that transforms kitchen time into a celebration of accomplishment and artistry. The secret to that seamless ombré effect? Simple, methodical color blending and thoughtful technique. Here’s a step-by-step breakdown:
Step 1: Prepare and Level Cake Layers
Start by baking your chosen cake layers according to the recipe or box directions. After allowing them to cool completely, use a serrated knife or cake leveler to trim any domed tops, ensuring each layer is flat and even for perfect stacking.
Step 2: Whip Up the Buttercream
In the bowl of a stand mixer, beat your softened unsalted butter until creamy and pale, about 3-4 minutes. Gradually add powdered sugar, salt, and vanilla (plus any flavor extras) until fluffy. Drizzle in milk or cream, a tablespoon at a time, until you reach your desired spreadable consistency.
Step 3: Divide and Tint Buttercream
Divide the buttercream evenly into four separate bowls—each one will correspond to a different depth of your chosen color. Using gel food coloring, tint each bowl to increasingly intense shades, starting with the lightest and working to the darkest hue. Remember, a little gel color goes a long way, so add gradually!
Step 4: Layer and Crumb Coat
Place your first cake layer on a cake turntable and add a generous amount of plain or lightly colored buttercream between each layer. Once stacked, apply a thin “crumb coat” of buttercream over the entire cake to lock in crumbs and prepare the surface for ombré application. Chill for 20-30 minutes.
Step 5: Apply Ombré Bands
With a straight spatula, apply each tinted buttercream onto the cake in horizontal bands, starting with the lightest shade at the top and progressing to the darkest at the bottom. Try to make the bands approximately even in width, but don’t worry about perfection—you’ll blend soon!
Step 6: Blend the Ombré
Using a clean spatula or cake scraper, gently smooth the frosting horizontally, working your way around the cake several times. As you go, the colors should softly blend at their edges, creating that mesmerizing ombré effect. If necessary, wipe your scraper between passes to avoid muddying the shades.
Step 7: Decorate and Celebrate
Once you’re happy with the ombré blend, use leftover buttercream to pipe swirls or rosettes on top. Add sprinkles, edible glitter, or graduation-themed toppers for a party-ready finish. Snap plenty of photos—this cake is worthy of the ‘Gram!
Serving Suggestions
Serving your Ombré Graduation Cake is all about celebration and presentation! For maximum “wow,” slice into the cake at the party’s peak—ideally, when everyone can gather around and admire the colorful interior. Pair each decadent slice with:
- Sparkling lemonade or mocktails in the matching color palette
- Bite-sized fruit skewers or chocolate-dipped strawberries
- Graduation-themed party favors (mini diplomas or caps)
- A scoop of vanilla ice cream for extra indulgence
If you’re serving a crowd, cut the cake using a hot, damp knife for clean, Instagram-worthy slices. This cake looks especially striking on a pedestal stand or against a bold party backdrop—don’t forget those group photos!
Pro Tips & Tricks
With a little know-how, even an intermediate baker can achieve bakery-worthy ombré gradients:
- Let your cake layers cool completely before assembling to prevent melted frosting disasters.
- Use gel food coloring sparingly; the colors will intensify slightly as they sit.
- If your buttercream becomes too soft as you decorate, pop the cake and leftover frosting in the fridge for 10 minutes before continuing.
- For ultra-neat color bands, use a piping bag with a wide flat tip to apply colored sections before smoothing.
- Rotate the cake turntable as you blend the frosting for even, continuous color transitions.
- Chill the crumb-coated cake before adding ombré layers for maximum stability and ease of decorating.
- Don’t strive for perfection—subtle imperfections add charm and a homemade touch!
- Clean your spatula between each color band to prevent muddy or streaky mixing.
With these tips, your Ombré Graduation Cake will look fit for a professional pâtisserie (and taste even better).
Storage Instructions
- Store your Ombré Graduation Cake in a cool, dry place covered with a cake dome or loosely wrapped in plastic wrap for up to 24 hours at room temperature.
- If your celebration is more than a day away, refrigerate the cake in an airtight container for up to four days. Bring to room temperature before serving for the best flavor and texture.
- Leftover cake slices can be individually wrapped and frozen for up to two months. To thaw, unwrap and let stand at room temperature for about 45 minutes.
- Always avoid storing cakes near strong odors (like onions or cheese) to prevent flavor transfer.
Proper storage ensures every bite of your cake is just as delicious and visually stunning as the first!
General Information
The Ombré Graduation Cake isn’t just a trend—it’s a staple for modern celebrations, offering endless possibilities for customization. Traditionally, ombré cakes wow with their beautiful color transitions, symbolizing growth and achievement—the very essence of graduation. The technique, while impressive, is wonderfully accessible with the right recipe and a few essential tools. Not only does the cake provide a canvas for creativity, but it also embodies the emotions of pride and joy that define graduation season. Whether you’re making this cake as a centerpiece for a party or as a heartfelt homemade gift, every layer tells a story, every shade marks a step toward a brighter future.
FAQs
Can I use boxed cake mix for the Ombré Graduation Cake?
Absolutely! Boxed cake mixes are a fantastic time-saver. Just be sure to allow the cakes to cool completely and level the tops before frosting for the best ombré effect.
How can I achieve the smoothest possible ombré frosting?
Use a high-quality bench scraper and rotate your cake turntable smoothly. If you see uneven spots, chill the cake and go around once more with a clean scraper.
What if I don’t have a cake turntable?
While a turntable makes blending easier, you can use a lazy Susan or carefully rotate a heavy plate to achieve even frosting.
Can I make the cake layers and buttercream in advance?
Yes! Bake and cool cake layers up to two days ahead and wrap them tightly. Buttercream can be made in advance and stored in the fridge—just let it come to room temperature and re-whip before using.
Is it possible to use natural food coloring?
Definitely—liquid or powder-based natural dyes work, though the colors may be softer and less vivid than traditional gels.
How do I prevent my colored buttercreams from tasting bitter?
Choose gel food colorings labeled “taste-free” and add gradually. Adding a drop or two of vanilla or almond extract can also help mask any bitterness.
Conclusion
The Ombré Graduation Cake marries artistry, tradition, and pure celebration in a dessert that’s as meaningful as it is delicious. Whether you’re baking for the graduate in your life or simply want to master a new cake-decorating skill, this recipe promises to be a centerpiece your guests will rave about and your grad will remember. Here’s to new adventures, sweet milestones, and colorful, homemade joy—congratulations!
Nutritional Information
A typical slice of Ombré Graduation Cake (assuming 16 servings from a 3-4 layer 9-inch cake, each with a generous coat of buttercream) contains:
- Approximately 420-500 calories per slice
- 16-22g total fat (butter-heavy frosting)
- 58-65g carbohydrates (mostly from sugar and flour)
- 0.5-1g fiber (may vary by cake base)
- 3-5g protein
- 180-250mg sodium
- Important vitamins and minerals: Trace amounts of calcium (from butter and milk) and iron (from flour, if using enriched cake base)
Keep in mind, exact nutritional values will vary depending on specific recipes, flavorings, and any substitutions you make. Treat this cake as a celebratory indulgence—a sweet way to honor life’s biggest achievements. Enjoy every bite!
Print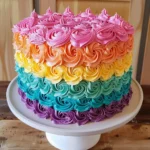
Ombré Graduation Cake: Stunning Layered Celebration Dessert
- Total Time: 30 minutes
- Yield: 12
Description
The Ombré Graduation Cake is an impressive celebration dessert featuring three to four tender cake layers enveloped in smooth, white buttercream. Created with graduating shades of gel food coloring, this cake showcases a rich visual ombré effect. Using a turntable and spatulas, colored buttercream is precisely blended for a seamless transition and striking finish, perfect for graduation festivities.
Ingredients
- 3 to 4 cake layers (flavor of choice, baked and cooled)
- Large amount of white buttercream frosting
- Gel food coloring in 3 or 4 graduating shades
- Several spatulas
Instructions
- Place the first cake layer on a cake turntable and secure it with a dab of buttercream.
- Stack remaining layers with a thin layer of buttercream between each, ensuring even alignment.
- Divide the buttercream into 3 or 4 bowls, depending on the number of shades desired.
- Add gel food coloring to each bowl, making each color slightly darker than the previous.
- Starting at the base, apply the darkest colored buttercream in a horizontal band around the cake.
- Continue adding lighter colored buttercreams in consecutive bands up the cake, finishing with the lightest shade or white at the top.
- Using a clean spatula, gently blend the interfaces between each color by swiping horizontally to create an ombré effect.
- Smooth the sides and top, clean up the cake base, and refrigerate to set the frosting before serving.
Notes
For cake layers, use vanilla, chocolate, or your preferred flavor; vanilla buttercream can be replaced with cream cheese or vegan frosting. Use natural food coloring for a dye-free alternative. Assembled cake keeps refrigerated up to 3 days; bring to room temperature before serving. If your ombré colors won’t blend smoothly, let the frosting rest and use a warmed spatula. Buttercream too stiff? Add a touch of milk. Cake can be baked and wrapped ahead, then assembled and decorated on the event day.
- Prep Time: 30 minutes
- Cook Time: 0 minutes
- Category: Dessert
- Method: Frosting and Assembling
- Cuisine: American