
Homemade Ice Cream Recipe: The Easiest Way to Satisfy Your Sweet Tooth
Table of Contents
Few things capture the heart of summer quite like a big, creamy scoop of ice cream. But what if you could whip up a batch right in your own kitchen—without any special kitchen gadgets or a lengthy ingredient list? That’s the magic of this Homemade Ice Cream Recipe. Whether you’re craving a nostalgic treat, looking to beat the heat with something cold, or wanting to impress your family and friends with a DIY dessert, making ice cream at home transforms an everyday experience into something truly special.
This recipe for homemade ice cream is all about simplicity, using just four staple ingredients: heavy whipping cream, sweetened condensed milk, vanilla extract, and a little dash of milk to bring the creamy dream to life. Don’t have an ice cream machine? No worries at all! You’ll only need a freezer and a food processor (or a blender)—in just a few steps, you can indulge in velvety, melt-in-your-mouth ice cream any time that craving strikes. From summer garden parties to cozy movie nights, this easy recipe has you covered.
Let’s face it—store-bought ice cream often contains more than just cream and sugar. Stabilizers, artificial flavors, and unpronounceable ingredients are shockingly common. But with this straightforward homemade ice cream recipe, you’re in full control. You get to choose the quality and source of your ingredients, adapt flavors to your liking, and even tweak sweetness to suit your palate. The result? An ultra-creamy, customizable dessert that’s as pure as your imagination. So dust off your freezer-friendly containers and gather your mixing bowls—there’s never been a better time to try making homemade ice cream!
Whether you’re a kitchen newbie or a seasoned baker, this recipe will make you feel like a dessert pro. Read on to discover why you’ll fall in love with this homemade ice cream recipe, explore inventive variations and substitutions, and master every step for the absolute best results.
Why You’ll Love Homemade Ice Cream Recipe
The homemade ice cream recipe isn’t just a sweet treat—it’s an experience. First and foremost, making ice cream at home allows you to get creative. Unlike store-bought options, you can mix and match flavors, add swirls, and top each scoop with your favorite goodies. Imagine a sundae bar with every spoonful tailored to your taste buds—impossible with a standard carton from the freezer aisle!
Another reason to love this homemade ice cream recipe is how incredibly easy it is. No churning, no special equipment, and no culinary degree required! If you have a freezer, a blender or a food processor, and a handful of common ingredients, you’re ready to start. Best of all, the ingredients are likely already sitting in your kitchen, making ice cream cravings instantly manageable.
Perhaps most importantly, homemade ice cream means you get to skip the artificial additives and focus on real, honest-to-goodness flavors. You can adjust the sweetness, thickness, and flavor profile to create the treat of your dreams—extra vanilla for those who love it, or just a touch for a more subtle finish. Whether you’re making this recipe for your kids, hosting a dinner party, or just indulging after a long week, the joy of scooping up a batch of ice cream you made yourself is unbeatable.
If you haven’t tried a homemade ice cream recipe, this is the perfect place to start—you’re about to find out just how rich, creamy, and versatile this dessert classic can be!
Ingredients for Homemade Ice Cream Recipe
Before you get started with this homemade ice cream recipe, let’s take a closer look at the ingredients that make it so easy, creamy, and delicious. Each component plays a critical role in delivering that iconic ice cream texture and flavor, and you don’t need to overspend on fancy or rare items. Simple ingredients, maximum flavor!
- 2 cups Heavy Whipping Cream (about 500g): The foundation of every luxurious ice cream is good, rich cream. Heavy whipping cream provides the luscious, silky base, ensuring each bite is smooth and satisfying. For the best results, use cream that’s fresh and preferably with a fat content above 35%. This creates a stable texture without the need for eggs or custard.
- 9 oz Sweetened Condensed Milk (about 250g): This magic ingredient brings sweetness, adds density, and helps bind the mixture without ice crystals forming. Sweetened condensed milk is thick, sticky, and rich, contributing to a creamy mouthfeel that sets homemade ice cream apart from icy or grainy alternatives. If you prefer a less-sweet dessert, you can reduce the quantity by a few tablespoons to taste.
- 2 teaspoons Vanilla Extract: Vanilla is the soul of classic ice cream flavoring. Opt for a high-quality pure vanilla extract—not imitation—for the most aromatic and full-bodied taste. You can get playful here: swap in vanilla bean paste for speckled, gourmet results, or try a splash of bourbon vanilla for an adult twist.
- 2 to 3 tablespoons Milk: Milk is used at the blending stage to adjust consistency. Start with 1 to 2 tablespoons and only add more if needed. The milk helps your blender (or food processor) break down the frozen cubes smoothly for a scoopable, just-like-store-bought texture.
Optional add-ins: Fresh fruit, chocolate chips, crushed cookies, caramel swirls, or nuts can be added during the blending or folding stage to personalize your homemade ice cream recipe.
Together, these accessible ingredients come together for a dreamy, foolproof dessert. Let’s talk preparation!
Necessary Tools
Part of the beauty of this homemade ice cream recipe is its simplicity—not only are the ingredients accessible, but the tools you’ll need are probably already in your kitchen. Forget those intimidating ice cream machines; we’re keeping things easy and fuss-free.
- Mixing Bowl: A medium to large bowl is all you need to combine your heavy cream, sweetened condensed milk, and vanilla extract. Make sure it’s large enough to allow you to stir without spilling.
- Whisk or Silicone Spatula: For gently mixing your ingredients together into a creamy, homogenous base.
- Ice Cube Tray—or Silicone Molds: You’ll pour your mixture into these for freezing. Silicone molds make it easier to pop out the frozen cubes, but a standard ice cube tray works perfectly fine.
- Freezer-Safe Container: While you initially freeze in cubes, you’ll want a freezer-safe container to store the final, finished ice cream for easy scooping.
- Blender or Food Processor: This is the game changer—after freezing, you’ll blend the cubes with milk to create that signature smooth and creamy texture. Both tools work; just make sure your device can handle frozen ingredients.
- Piping Bag or Ice Cream Scoop (Optional): For serving. If you want to create swirl-topped cones or elegant dessert bowls, use a piping bag. Otherwise, a sturdy ice cream scoop works just as well.
With these tools, you’ll have everything you need to whip up this easy homemade ice cream recipe, making dessert time a breeze!
Ingredient Additions & Substitutions
One of the absolute joys of a homemade ice cream recipe is the endless possibility for creativity and customization. Not only can you tailor flavors to suit your preference—dietary needs, allergies, and ingredient availability are all easy to accommodate.
Flavor Additions
- Fruit Swirls: Add a handful of frozen berries (strawberries, raspberries, or blueberries) into the blender with your frozen cubes for fruity ice cream. Or, fold in freshly chopped fruit after blending for pops of flavor and color.
- Chocolate Lovers: Pour in a tablespoon of cocoa powder with the original mixture for chocolate ice cream, or fold in mini chocolate chips, shaved chocolate, or a ribbon of chocolate syrup before freezing.
- Nutty Variations: Add a spoonful of peanut butter or almond butter for richness and flavor. Chopped toasted nuts (walnuts, pecans, pistachios) stir in beautifully.
- Cookie & Candy Mix-Ins: Fold in chopped cookies (Oreos, graham crackers) or your favorite candies (mini M&Ms, chocolate chunks, marshmallows) to make each bite exciting.
Substitutions
- Dairy-Free & Lactose-Free: Substitute heavy cream with full-fat coconut cream or a barista-style oat cream; swap sweetened condensed milk for dairy-free condensed coconut milk (available at many grocery stores or online). The texture will be slightly different but still creamy and delicious.
- Sugar-Free: Use a sugar-free or lightly sweetened condensed milk substitute (available in specialty stores or homemade) for a lower-carb treat. Just be aware that changing the sugar content may slightly alter the texture.
- Flavored Creams: If you want a punch of flavor, try using pre-flavored coffee creamers in place of part of the cream, such as hazelnut or caramel. Adjust the vanilla and sweetened condensed milk to taste, as these may contain added sugar or flavorings.
Ingredient Quality
- Cream: Look for fresh cream with a high fat content for best mouthfeel. Ultra-pasteurized cream tends to be more convenient but slightly less rich in flavor; use what’s available.
- Vanilla: Pure vanilla extract or vanilla bean paste gives the best flavor, but you can also infuse the cream with a scraped vanilla bean for gourmet results.
Dietary Modifications
- Vegan: Choose vegan alternatives both for cream (coconut, soy, or oat) and for condensed milk (coconut-based is easiest to find).
- Allergens: If you’re avoiding nuts or gluten, the base recipe contains neither; just be mindful of mix-ins or extra flavorings.
With these additions and substitutions in mind, the classic homemade ice cream recipe can take on countless new identities—from mocha fudge swirl to lemon-raspberry ripple! Don’t be afraid to experiment as you go.
How to Make Homemade Ice Cream Recipe
Ready to craft your dreamy dessert? Here’s a step-by-step breakdown for the perfect homemade ice cream recipe. This method is designed to give you rich, creamy results every single time—no expensive gadgets needed.
Step 1: Mix the Cream, Condensed Milk, and Vanilla
Start by grabbing your mixing bowl. Pour in 2 cups of heavy whipping cream, add the 9 oz of sweetened condensed milk, and drop in the 2 teaspoons of vanilla extract. Gently whisk everything together until fully combined and creamy in texture. Avoid whipping or over-agitating the mixture—it should be smooth and well-blended, not airy or fluffy.
Step 2: Freeze in Ice Cube Trays
Next, carefully pour the creamy mixture into your ice cube trays or silicone molds. Fill each compartment evenly, leaving a little room for expansion as the ice cream freezes. Transfer the tray(s) to your freezer and let them chill overnight, or for at least 6-8 hours. The goal is for the cubes to be completely solid before the next step.
Step 3: Blend the Frozen Cubes with Milk
Once frozen, pop the ice cream cubes out of the trays and transfer them to your blender or food processor. Add 1-2 tablespoons of milk to the cubes to help your machine break them down smoothly. Blend on high speed, scraping down sides as needed, until the mixture is silky, creamy, and lump-free. If it seems too thick, add milk a tablespoon at a time until you reach your preferred consistency.
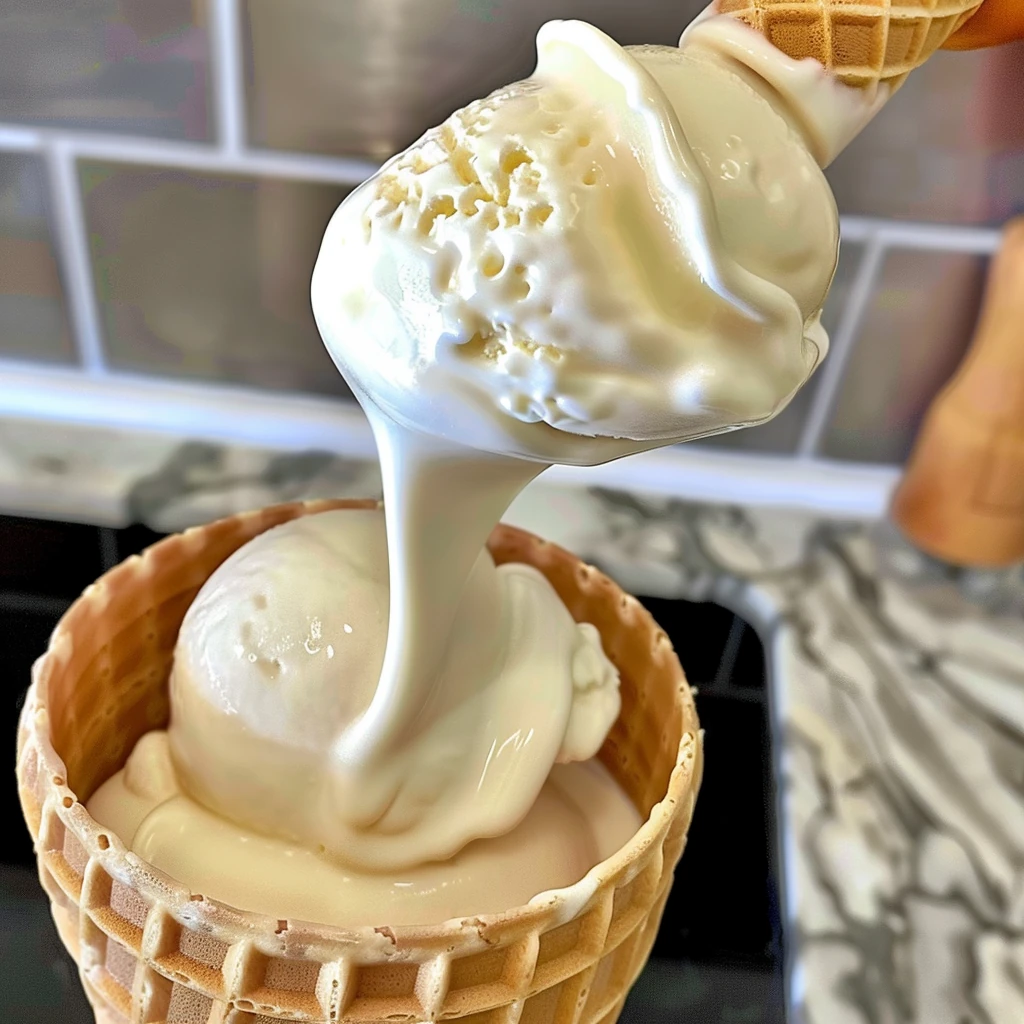
Step 4: Pipe or Scoop into Cones
Your homemade ice cream is now ready to be enjoyed! For a classic look, transfer the smooth ice cream into a piping bag and pipe it into cones. Alternatively, scoop it directly into cones or bowls. Serve immediately for a soft-serve experience, or return it to the freezer in an airtight container for a firmer, scoopable texture after a few hours.
That’s it—a homemade ice cream recipe that’s simple, speedy, and sure to become a family favorite!
Serving Suggestions
This homemade ice cream recipe is endlessly adaptable, so have fun with your presentation! Here are a few ways to serve and enjoy your creation:
- Classic in a Cone: Serve your ice cream in sugar or waffle cones, and top with rainbow sprinkles, crushed nuts, or mini chocolate chips for a festive touch.
- Sundae Style: Heap scoops into bowls and drizzle with chocolate, caramel, or berry sauce. Add whipped cream, maraschino cherries, or your favorite toppings.
- Ice Cream Sandwiches: Sandwich a scoop between two cookies (chocolate chip, oatmeal, or peanut butter) for a playful dessert.
- Affogato: For grown-ups, pour a shot of hot espresso over a scoop of vanilla ice cream for a decadent Italian treat.
- Float: Drop a scoop into a glass of soda, root beer, or cold brew coffee for a bubbly, retro-inspired float.
- Frozen Fruit Swirl: Add a swirl of fruit jam, berry sauce, or pureed mango to the blended ice cream just before serving for a beautiful and flavorful twist.
However you serve it, this homemade ice cream recipe is a guaranteed hit every time.
Pro Tips & Tricks
To make sure your homemade ice cream recipe turns out as creamy and dreamy as possible, here are some expert tips:
- Don’t Overmix: When combining your cream, sweetened condensed milk, and vanilla, keep the mixture smooth but avoid whipping air into it. Airiness can cause iciness in the final product.
- Freeze Solidly: Make sure your ice cream cubes are completely frozen before blending, for the best texture and easiest processing.
- Chill Your Tools: If you have time, pre-chill your mixing bowl and utensils before starting. Cold tools can help keep everything at the perfect temperature.
- Gradually Add Milk: When blending, start with the minimum amount of milk and only add more as needed for smoothness. Adding too much can thin the ice cream excessively.
- Customize Texture: Prefer a firm ice cream? After blending, transfer it to a freezer-safe container and freeze for another hour or two for a classic, scoopable consistency.
- Avoid Over-Mixing in Blender: Over-blending once the cubes are almost smooth can result in a runny mixture. Blend just until creamy.
- Mix-Ins and Swirls: Fold in chocolate chips, cookie crumbles, or fruit purees after blending but before refreezing for even dispersal and pretty presentation.
- Store Smoothly: To prevent ice crystals, press a layer of parchment or wax paper against the surface of the ice cream before covering the container.
Follow these tricks, and this homemade ice cream recipe will be your go-to dessert for years to come!
Storage Instructions
Proper storage is key to keeping your homemade ice cream recipe fresh and scoopable. Here’s how to do it right:
- Freezer Container: Once blended, transfer the finished ice cream into an airtight, freezer-safe container. A flat, shallow container will help ice cream freeze evenly and make scooping easier.
- Cover Tight: Press a sheet of plastic wrap, parchment, or wax paper directly onto the surface before sealing with a lid. This helps prevent freezer burn and ice crystals.
- Label: If you’re experimenting with flavors, label the container with the date and type so you can keep track of your creations.
- Shelf Life: For best flavor and texture, enjoy your homemade ice cream recipe within two weeks. While it’s still safe to eat after that, you might notice a decrease in creaminess or freshness.
- Soften Before Scooping: Straight from the freezer, the ice cream may be quite firm. Let it sit at room temperature for 5-10 minutes for easier scooping.
With these storage guidelines, you’ll keep every batch as fresh and irresistible as the day it was made!
General Information
A homemade ice cream recipe isn’t just a fun kitchen project—it’s a delicious way to avoid unnecessary additives and create a dessert tailored exactly to your taste. This recipe gives you the flexibility to make as much or as little as you want, perfect for parties or for a solo treat. Plus, it’s naturally egg-free and gluten-free, making it a crowd-pleaser for many dietary needs.
Preparing ice cream this way is also quick and rewarding. The act of making your own ice cream invites creativity, whether you’re crafting a classic vanilla batch or experimenting with bold new flavors and exciting toppings. Kids love joining in on the process, and guests will be wowed by your homemade dessert.
The steps are simple, the cleanup is minimal, and the flavor is exceptional. Because you control the ingredients, you can make healthy tweaks or go all out with decadent add-ins. This homemade ice cream recipe is great for holidays, birthdays, or just to celebrate everyday happiness!
FAQs
How long does homemade ice cream last in the freezer?
Your homemade ice cream recipe will maintain its best flavor and texture for up to two weeks in an airtight container. After this period, it’s still safe to eat but may become more icy or lose some of its creamy characteristics.
Can I add flavors or mix-ins to the base recipe?
Absolutely! One of the best parts of this homemade ice cream recipe is its versatility. Fold in chocolate chips, nuts, caramel sauce, swirling in fruit purees, or your favorite candies for a custom creation.
What if I don’t own an ice cube tray?
No problem—use silicone muffin cups, popsicle molds, or even small bowls to freeze your mixture. Anything freezer-safe with small compartments will work.
My ice cream is too soft/runny after blending—what can I do?
If your ice cream is softer than you’d like, simply transfer it to the freezer in an airtight container for 1-2 hours to firm up before serving.
Conclusion
There you have it: a homemade ice cream recipe that’s as easy as it is delicious! With just a few simple ingredients, basic kitchen equipment, and a little bit of time, you can say goodbye to store-bought pints and hello to endlessly customizable, ultra-creamy desserts. Not only will you enjoy the rich flavors and smooth textures that only homemade ice cream can deliver, but you’ll also have peace of mind knowing exactly what went into every batch.
This recipe is the ultimate treat for sunny afternoons, birthday celebrations, or whenever a sweet craving strikes. Plus, it’s perfect for sharing—kids and grown-ups alike will love scooping, topping, and devouring every last bite. So gather your ingredients, follow these easy steps, and let your culinary creativity run wild. Making homemade ice cream is more than just a recipe—it’s an experience you’ll want to repeat again and again.
Ready to impress your friends and family? Start with this classic vanilla base and let your imagination lead the way. Happy scooping!
Print
Homemade Ice Cream Recipe
- Total Time: 8 hours 10 minutes
- Yield: 6
Description
Homemade Ice Cream Recipe delivers creamy, no-churn vanilla ice cream using simple ingredients and minimal equipment. Combine heavy whipping cream, sweetened condensed milk, and vanilla extract, gently mixed for a smooth base. Frozen in cubes, then blended with milk, this method provides a rich, smooth texture, perfect for cones or bowls at home without special machinery.
Ingredients
- 2 cups heavy whipping cream (500g)
- 9 oz sweetened condensed milk (250g)
- 2 teaspoons vanilla extract
- 2 to 3 tablespoons milk
Instructions
- In a large mixing bowl, combine heavy whipping cream, sweetened condensed milk, and vanilla extract. Mix gently until fully integrated and creamy, ensuring not to whip the mixture.
- Pour the creamy mixture evenly into an ice cube mold. Place in the freezer and freeze overnight or until solid.
- Transfer the frozen cubes into a food processor. Add 1–2 tablespoons of milk and blend until smooth and creamy. Add more milk as needed to achieve desired ice cream consistency.
- Use a piping bag or ice cream scoop to transfer the soft ice cream into cones or bowls. Serve immediately.
Notes
You can substitute vanilla extract with almond, mint, or fruit extracts for a flavor twist. Dairy-free versions work using coconut cream and coconut condensed milk. Freeze prepared cubes for up to 2 weeks, storing finished ice cream in an airtight container for up to 1 week. If the blend is too thick, add extra milk gradually. If texture is icy, blend longer or add more milk for smoothness.
- Prep Time: 10 minutes
- Cook Time: 0 minutes
- Category: Dessert
- Method: Freezing, Blending
- Cuisine: American