

Cheers to the Grad Vanilla Cake: The Ultimate Graduation Party Centerpiece
Graduation is a time of joy, reflection, and celebration—and every remarkable accomplishment deserves a show-stopping dessert. Enter the “Cheers to the Grad Vanilla Cake,” a three-layer masterpiece that’s as delicious as it is festive. This cake combines light, fluffy vanilla layers with vibrant sprinkles and rich white buttercream, all topped off with a cheerful congratulatory message. Whether you’re hosting a big bash or sharing a quiet family moment, Cheers to the Grad Vanilla Cake brings sweet flavor, bright color, and a touch of playful nostalgia to your celebration. If you’re searching for the perfect graduation cake recipe, look no further—this one captures graduation vibes and creates a memorable dessert experience everyone will rave about. Ready to wow your guests and honor your grad in style? Let’s dive into all the reasons you’ll love making—and eating—this irresistible cake!
Why You’ll Love Cheers to the Grad Vanilla Cake
- Irresistibly moist and flavorful vanilla cake layers with an extra boost of richness
- Handcrafted look with vibrant rainbow sprinkles and piped congratulatory messages
- Simple, adaptable recipe using boxed cake mix, perfect for busy schedules
- Festive decoration options, making it easy to personalize for your grad
- Kid-friendly, but with sophisticated flavors for adults to enjoy
- Instagram-worthy presentation that looks stunning on any dessert table
Ingredients for Cheers to the Grad Vanilla Cake
Every ingredient in Cheers to the Grad Vanilla Cake plays a unique role in crafting a show-stopping dessert. From pantry staples to playful add-ins, here’s what you’ll need:
- Boxed vanilla cake mix (choose your favorite reliable brand for consistent results)
- Eggs (Add one extra egg to the box instructions for extra richness and structure)
- Vegetable oil (Substitute as directed on your box mix; helps create a moist crumb)
- Water or milk (Follow box instructions or substitute with whole milk for more flavor)
- Pure vanilla extract (A dash of extra vanilla elevates classic flavors)
- Rainbow sprinkles (Optional, but highly recommended for a funfetti effect and added color)
- Unsalted butter (For your homemade white buttercream)
- Powdered sugar (Essential for a smooth buttercream finish)
- Heavy cream or milk (Adjusts buttercream consistency for both spreading and piping)
- Pinch of salt (Balances sweetness in your buttercream)
- Food coloring gel (For vivid “Cheers to the Grad” messages; gel works best for intense color without thinning the frosting)
- Letter stencils (Makes piping professional-looking congratulatory messages easy)
- Optional: Silver or gold sanding sugar, edible glitter, or themed cake toppers for extra flair
All of these ingredients are easy to find at most grocery stores, making it simple to whip up your Cheers to the Grad Vanilla Cake on a moment’s notice!
Necessary Tools
To ensure a seamless baking and decorating experience, gather these essential tools before you begin your Cheers to the Grad Vanilla Cake:
- 3 (8-inch or 9-inch) round cake pans (for three even, picture-perfect layers)
- Parchment paper rounds (Keeps cakes from sticking and ensures easy release)
- Mixing bowls (You’ll need a large one for cake batter and a medium one for buttercream)
- Electric mixer or stand mixer (For smooth batter and fluffy icing)
- Measuring cups and spoons (Precision matters with both cake and frosting)
- Offset spatula (Creates ultra-smooth icing surfaces for professional results)
- Piping bags (Disposable or reusable; you’ll need several for colored frosting)
- Medium round piping tip (Ideal for lettering and accent details)
- Letter stencils (Guides for neat, celebratory writing)
- Cake leveler or serrated knife (Optional, for leveling cake layers)
- Rotating cake stand (Helps evenly frost and decorate your cake)
- Cooling rack (Speeds up cooling and prevents soggy bottoms)
- Bench scraper (Smooths the sides of your cake like a pro)
- Small bowls and spoons (For mixing and tinting colored buttercream)
- Wide cake lifter or long spatula (Assists in stacking delicate layers)
- Sprinkle pan or shallow dish (Contains sprinkles for fuss-free decorating)
Having these tools ready will make each step of creating your Cheers to the Grad Vanilla Cake stress-free and enjoyable, even for intermediate bakers.
Ingredient Additions & Substitutions
The best part about the Cheers to the Grad Vanilla Cake is how adaptable it is to suit different dietary needs, flavor preferences, and creative whims. Here’s how you can customize or tweak the recipe without losing its celebratory spirit:
- Cake Base: While vanilla is classic, you can swap out the boxed mix for chocolate, funfetti, lemon, or strawberry flavors depending on your grad’s favorites. For a homemade touch, use your go-to scratch vanilla cake recipe.
- Eggs: The extra egg enriches the batter, but if you need an egg-free version, use a commercial egg replacer or a “flaxseed egg” (1 tbsp ground flaxseed + 2.5 tbsp water per egg).
- Oil & Liquid: Substitute vegetable oil with melted coconut oil or unsalted butter for a subtle flavor shift. Whole milk or buttermilk can also replace water for an ultra-moist crumb.
- Vanilla: Amplify flavor by using vanilla bean paste, or add a splash of almond, lemon, or coconut extract to the batter for a unique twist.
- Sprinkles: For a more sophisticated look, use gold or silver dragees, mini chocolate chips, or confetti-shaped sprinkles. Be careful to use “jimmies” (the rod-shaped sprinkles) in the batter—other sprinkle types may dissolve.
- Buttercream: Basic American buttercream is easy and stable, but you can substitute with cream cheese frosting, Swiss meringue buttercream, or a whipped mascarpone if you prefer a lighter texture.
- Dairy-Free & Gluten-Free: Many grocery stores carry reliable gluten-free and dairy-free cake mixes and plant-based butters. Use non-dairy milk in both cake and frosting with equally delicious results.
- Food Coloring: Gel coloring produces vibrant hues with just a drop, but natural plant-based colorings are available for those seeking an artificial dye-free option.
- Decorations: If piping letters feels daunting, buy pre-made graduation cake toppers, edible ink pens, or even create a printed sugar sheet message.
- Add-ins: Fold mini chocolate chips, chopped strawberries, or lemon zest into the batter for an extra burst of flavor and fun.
Personalizing your Cheers to the Grad Vanilla Cake ensures your celebration is both memorable and meaningful, catering to the special graduate and the crowd gathered to honor them!
How to Make Cheers to the Grad Vanilla Cake
Creating the perfect Cheers to the Grad Vanilla Cake is straightforward but rewarding. With simple steps and vibrant decorations, you’ll craft a bakery-worthy dessert that will become the centerpiece of your graduation party. Here’s a detailed guide to bring your cake to life:
Step 1: Prepare Your Cake Batter
Follow the instructions on your favorite boxed vanilla cake mix, but add one extra egg and an extra teaspoon of pure vanilla extract to the batter. These small tweaks deliver a richer, more luxurious cake that tastes homemade. If you’d like, fold in a generous handful of rainbow sprinkles for a funfetti-style surprise in every slice.
Step 2: Bake the Cake Layers
Line three 8-inch (or 9-inch) round cake pans with parchment rounds and lightly grease the sides. Evenly divide the batter between the pans. Bake as directed on the box instructions, but keep a close eye for doneness: when a toothpick inserted in the center comes out clean and the edges pull slightly away, they’re done! Allow cakes to cool in the pans for 10 minutes, then transfer to a wire rack to cool completely.
Step 3: Make the White Buttercream
In a large bowl, beat unsalted butter on medium speed until light and creamy. Gradually add sifted powdered sugar, mixing on low until incorporated and then on medium-high for fluffy texture. Add a splash of heavy cream (or milk), pure vanilla extract, and a pinch of salt. Continue beating until buttercream is soft, luscious, and spreadable. Adjust the consistency with more cream if necessary.
Step 4: Assemble and Frost the Cake
Once your cake layers are completely cool, level them with a serrated knife if desired. Place the first layer on your serving platter or cake turntable. Spread a generous layer of buttercream on top. Repeat with the second and third layers. Frost the entire cake with a thin “crumb coat” and chill for 20-30 minutes, then apply a final smooth coat of white buttercream with an offset spatula and bench scraper.
Step 5: Decorate with Sprinkles
Pour rainbow sprinkles into a shallow pan or dish. Gently press handfuls of sprinkles around the base of the cake and atop the edge (or wherever you want a festive burst of color). The more sprinkles, the merrier!
Step 6: Pipe the “Cheers to the Grad” Message
Separate a portion of buttercream into small bowls and tint them with food coloring gel as desired. Fit piping bags with a medium round tip and fill with colored frosting. Slide your letter stencils onto the cake, then carefully pipe the “Cheers to the Grad” message onto the top and/or sides. Remove stencils and tidy any edges with a damp toothpick or small offset spatula.
Step 7: Final Touches and Presentation
Add any extra decorations—think edible glitter, gold sugar, or themed toppers. Chill the finished cake briefly to set the buttercream if desired, then serve at room temperature for the best flavor and texture.
Serving Suggestions
The Cheers to the Grad Vanilla Cake is designed to be the showpiece of any graduation celebration. Here are some festive serving ideas to make the moment extra special:
- Pair slices with a sparkling fruit punch or lemonade for a cheerful toast.
- Serve alongside bowls of fresh berries or a scoop of vanilla bean ice cream.
- Create a celebratory dessert bar with mini candies, extra sprinkles, and individual cupcakes in matching colors.
- Garnish each plate with a mini graduation cap topper or personalized edible diploma scroll.
- Offer a variety of hot or iced coffee drinks for the adults and fun sodas for the younger crowd.
- For a photo-worthy display, present the cake on a pedestal surrounded by graduation cards or memorabilia.
No matter how you serve it, this cake promises to delight the crowd and make your graduate feel truly celebrated.
Pro Tips & Tricks
Achieving a flawless Cheers to the Grad Vanilla Cake is easy with a few insider tricks:
- Always use room temperature ingredients for a smoother batter and more stable buttercream.
- For extra-moist layers, brush each cake layer lightly with simple syrup before frosting.
- Chill the cake layers briefly before stacking and frosting—they’ll be firmer and less likely to crumble.
- Don’t overmix the batter (especially with boxed mix), as it can create a dense cake.
- Gel food coloring yields vivid colors without thinning your buttercream—add a little at a time until you reach the shade you want.
- For sharp edges and a bakery-worthy finish, use a bench scraper and an offset spatula dipped in hot water (then wiped dry).
- Practice piping your message on parchment before decorating the actual cake.
- If time is tight, bake the cake layers a day ahead and wrap tightly in plastic until ready to assemble.
- For clean, professional writing, let the buttercream set for 20 minutes in the fridge before using stencils and colored frosting.
- Have fun! Graduation is a joyful time—don’t stress over minor imperfections; it’s the love and celebration that count.
Storage Instructions
Proper storage keeps your Cheers to the Grad Vanilla Cake tasting fresh and beautiful:
- Store leftover cake in an airtight container or covered with a cake dome at room temperature for up to two days.
- For longer storage, refrigerate the cake, especially if your kitchen is warm. Let it come to room temperature before serving to restore softness.
- Unfrosted cake layers can be wrapped tightly in plastic and frozen for up to one month. Thaw in the fridge overnight, then frost and decorate as desired.
- Leftover frosted slices can be wrapped individually in plastic wrap and stored in the fridge for up to five days.
- Avoid storing the cake in direct sunlight or near strong odors, as it may affect both color and flavor.
General Information
The Cheers to the Grad Vanilla Cake is the perfect intermediate-level baking project, ideal for bakers looking to practice their decorating skills while creating something truly meaningful. This cake yields 12-16 generous slices, depending on how you cut it, and is suitable for any graduation event—be it high school, college, or even a special preschool milestone! The use of boxed mix streamlines the process, while the addition of an extra egg and vanilla transforms it into a celebration-worthy treat. Multi-colored accents and piped messages allow you to personalize every detail to match your grad’s interests, school colors, or party theme. Whether baked with children, friends, or solo, this cake will become a wonderful memory and a new family tradition.
FAQs
Can I use gluten-free cake mix for Cheers to the Grad Vanilla Cake?
Absolutely! Choose your favorite gluten-free vanilla cake mix and follow the same instructions. Most gluten-free mixes work beautifully and no one will miss the wheat.
How far in advance can I decorate the cake?
The cake can be fully decorated up to 24 hours in advance, stored in the fridge, and brought to room temperature just before serving for best flavor and texture.
What kind of vanilla extract is best?
Pure vanilla extract or vanilla bean paste creates a rich, aromatic flavor. Avoid imitation vanilla if possible—it won’t deliver the same homemade taste.
Can I double the recipe for a larger crowd?
Yes, you can easily double the recipe and bake in larger pans or make two separate cakes. Adjust bake times as needed.
Do I have to use buttercream, or can I use whipped cream or cream cheese frosting?
American or Swiss meringue buttercream holds up best for piping and smooth finishes, but cream cheese frosting works well if kept chilled. Whipped cream is best used as a topping just before serving.
Are gel food colorings safe?
Yes! Gel-based food colorings are widely used in cake decorating and yield bright, saturated colors without affecting buttercream texture.
My letters aren’t perfect—what can I do?
Don’t worry! Use a small offset spatula or toothpick to tidy any lettering. Personal and handmade touches make the cake extra special.
Conclusion
There’s simply no sweeter way to say “Congratulations!” than with a homemade Cheers to the Grad Vanilla Cake. With its tender layers, festive sprinkles, and a personalized message for your accomplished grad, it serves both as an edible work of art and a heartfelt centerpiece for your celebration. Whether you’re a seasoned cake decorator or simply someone who wants to make a memorable dessert, this recipe ensures every graduation party ends on a sweet, joyful note. Happy baking—and congratulations to all the amazing graduates!
Nutritional Information
While the Cheer to the Grad Vanilla Cake is certainly decadent, celebrating a milestone deserves a little indulgence! Here’s what you can expect, per generous slice (based on 16 servings):
- Calories: Approximately 380-440
- Total Fat: 18-22g (mainly from butter and oil)
- Saturated Fat: 9-11g
- Cholesterol: 65-80mg
- Sodium: 280-350mg
- Total Carbohydrates: 54-60g
- Dietary Fiber: <1g
- Sugars: 37-42g
- Protein: 3-5g
Keep in mind, these values are estimates—actual nutrition will vary depending on the cake mix brand, buttercream amount, and sprinkles added. For reduced sugar or fat, consider using a lightened frosting or a sugar-substitute mix. Remember: graduation comes around only so often—enjoy every celebratory bite!
Print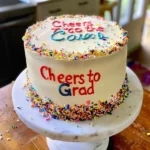
Vanilla Cake Cheers to the Grad Celebration
- Total Time: 1 hour 15 minutes
- Yield: 12
Description
Vanilla Cake Cheers to the Grad Celebration is a festive three-layer dessert, featuring moist vanilla sponge made from a box mix with an added egg and vanilla for richness. The cake is filled and frosted with creamy white buttercream, and can be personalized with hand-piped messages using stencils for a custom touch. Decorate with rainbow sprinkles to add color and fun.
Ingredients
- 1 box vanilla cake mix
- 4 large eggs (1 extra than box instructions)
- 1 tablespoon vanilla extract
- Ingredients required by cake mix (typically water, oil)
- Rainbow sprinkles (optional, 1/3 cup)
- 3 cups white buttercream frosting
- Food coloring gel (optional, for decorating)
- Letter stencils
- Piping bags
- Medium round piping tip
Instructions
- Preheat the oven to the temperature specified on the cake mix box. Grease and line three 8-inch round cake pans.
- Prepare the vanilla cake batter as directed on the box, adding one extra egg and vanilla extract to the mix. Gently fold in rainbow sprinkles if using.
- Divide the batter evenly between the three prepared pans and bake as directed, until a toothpick comes out clean. Let cakes cool completely.
- Level the cake layers if needed, then assemble the cake, spreading white buttercream between each layer and across the entire cake to frost smoothly.
- Fill a piping bag fitted with a medium round tip with buttercream. Place letter stencils on the cake’s surface and pipe ‘Cheers to the Grad’ message. Gently lift stencils away.
- Add additional decorations or colored buttercream accents as desired. Optional: Top with extra sprinkles.
- Chill the cake for at least 30 minutes to set frosting before serving.
Notes
Box vanilla cake mix may be swapped with homemade recipe; use unsalted butter for buttercream for smoother flavor. For dairy-free, substitute with plant-based milk and vegan butter. Cake layers can be baked a day in advance, wrapped tightly, and stored at room temperature. Buttercream can be refrigerated and rewhipped before use. If buttercream is too soft for piping, chill briefly. To fix runny frosting, add powdered sugar. Decorated cake keeps in the fridge for 3 days. Use parchment for easier pan removal.
- Prep Time: 30 minutes
- Cook Time: 25 minutes
- Category: Dessert
- Method: Baking
- Cuisine: American