

Irresistible Chocolate Cherry Cheesecake: 5 Reasons You’ll Love It
Few desserts whisper indulgence and elegance quite like Chocolate Cherry Cheesecake, and this recipe delivers a truly show-stopping slice. Imagine biting into a silky, creamy cheesecake filling nestled over a fudgy chocolate crust, with every forkful bursting with pops of tangy cherries. Decadence oozes in every detail: the glossy cherry topping, the scatter of rich chocolate shavings, and the glistening fresh cherries perched on top. Visually, this dessert is pure celebration—deep ruby red cherries pop against the creamy, pale cheesecake and dark chocolate base, glistening seductively. With its harmonious combination of flavors, textures, and stunning presentation, Chocolate Cherry Cheesecake promises to captivate both your taste buds and guests at any event. In this recipe, you’ll learn how easy it is to create a dessert that looks just as divine as it tastes.
Why You’ll Love Chocolate Cherry Cheesecake
- Layers of decadent chocolate and rich, creamy cheesecake complemented by vibrant, juicy cherries.
- Eye-catching presentation with glossy cherries and chocolate shards, perfect for special occasions or celebrations.
- Satisfying contrast of smooth, velvety filling and crispy chocolate crust.
- Easily customizable to suit dietary preferences or ingredient availability.
- Every bite is a blend of sweet, tangy, and bittersweet flavors—an unforgettable dessert experience.
Ingredients for Chocolate Cherry Cheesecake
Creating an unforgettable Chocolate Cherry Cheesecake starts with the freshest and finest ingredients to achieve its memorable taste and luxurious appearance. Here’s what you’ll need:
- 1 1/2 cups chocolate cookie crumbs (for a rich, fudgy base)
- 1/4 cup melted unsalted butter
- 2 cups fresh sweet cherries, pitted (save a few with stems for garnish!)
- 1 1/2 cups granulated sugar, divided
- 24 oz cream cheese (full-fat, at room temperature for maximum creaminess)
- 1 cup sour cream (adds tang and extra silkiness)
- 3 large eggs
- 2 teaspoons pure vanilla extract
- 1/3 cup unsweetened cocoa powder (deepens the chocolate flavor in the crust)
- 3/4 cup semi-sweet chocolate chips, melted and cooled
- 1 tablespoon cornstarch (to thicken cherry filling)
- 1 tablespoon lemon juice (brightens up the cherry layer)
- 1/2 cup heavy whipping cream (ensures ultra-creamy filling)
- 1/4 teaspoon salt (balances flavors)
- Fresh cherries and dark chocolate shavings for garnish
These carefully chosen ingredients work together to create a visually appealing chocolate crust, luscious cheesecake, luxurious cherry sauce, and an irresistible topping. The deep red cherries contrast beautifully with the white cheesecake layer and dark chocolate crust, crafting a dessert that is breathtaking and utterly scrumptious.
Necessary Tools
Preparing Chocolate Cherry Cheesecake is a joyful experience with the right kitchen tools on hand:
- 9-inch springform pan: For easy release and perfect sides.
- Mixing bowls (several sizes): To separate and mix each component efficiently.
- Electric mixer or stand mixer: For a smooth, lump-free filling.
- Spatula: Essential for folding and scraping every creamy bit.
- Food processor or zip-top bag and rolling pin: To crush chocolate cookies for the crust.
- Small saucepan: For simmering the homemade cherry sauce.
- Fine-mesh sieve: To strain cherries if you want an ultra-smooth topping.
- Measuring cups and spoons: Accuracy is key for perfect flavor and texture.
- Offset spatula or palette knife: For spreading layers evenly.
- Sharp knife: To pit cherries and create chocolate shavings for garnish.
- Parchment paper: For lining the bottom of the springform pan to prevent sticking.
The combination of these tools ensures your cheesecake layers come together easily and achieve that polished, professional presentation seen in high-end bakeries.
Ingredient Additions & Substitutions
Chocolate Cherry Cheesecake is a wonderfully flexible dessert. Whether you’re trying to accommodate allergies, preferences, or pantry limitations, here are some creative ways to adapt the recipe without sacrificing flavor or that signature, stunning look.
- Crust alternatives: Swap chocolate cookie crumbs for chocolate graham crackers, chocolate wafer cookies, or even gluten-free chocolate crackers for those with gluten sensitivities. For extra crunch, blend in a small handful of finely chopped nuts, like pecans or almonds.
- Cream cheese swaps: While full-fat cream cheese is classic, Neufchâtel cheese works well for a slightly lighter texture. Dairy-free varieties (like cashew- or coconut-based options) can make the cheesecake vegan-friendly—just be sure to check the firmness and consistency.
- Cherry options: Fresh sweet cherries are visually striking and offer the most flavor. Out of season, frozen cherries thawed and drained, or good-quality canned cherries, will suffice. Maraschino cherries can be used for garnish but aren’t recommended for the filling due to their intense sweetness and syrupy texture.
- Chocolate customization: For a different cocoa profile, try using dark chocolate or white chocolate chips. If you love deeper, bittersweet notes, use 70% cacao chocolate for an adult twist.
- Sweetener modifications: Replace some or all of the granulated sugar with coconut sugar or maple syrup for a subtle caramel undertone.
- Egg-free needs: Use a commercial egg replacer or a flaxseed mixture (1 tablespoon ground flax + 3 tablespoons water per egg) for an eggless cheesecake that still sets beautifully.
- Dairy-free adjustments: Substitute vegan butter, plant-based cream cheese and sour cream, and coconut cream for the dairy ingredients. Make sure these alternatives are unsweetened and unflavored.
- Thickening the cherry layer: Arrowroot powder can be used in place of cornstarch for a clear, shiny cherry sauce.
- Garnishes: Get creative—use gold leaf, a dusting of cocoa powder, chocolate curls, whipped cream rosettes, or extra cherry sauce drizzled on each slice to mirror the photo’s irresistible look.
With these swaps, Chocolate Cherry Cheesecake remains as irresistible as ever—creamy, chocolatey, vibrant, and worthy of any occasion.
How to Make Chocolate Cherry Cheesecake
Crafting a flawless Chocolate Cherry Cheesecake is as joyful as eating it. The process involves preparing a chocolatey crust, a silky-smooth filling, a glossy cherry topping, and assembling them into an irresistible showstopper. From the first blend to the final garnish, each step contributes to the dessert’s visual impact and unforgettable flavor, as seen in that glamorous finished slice—creamy filling, luscious cherries, chocolate shavings, and a dramatic drizzle of sauce.
Step 1: Prepare the Chocolate Crust
Crush the chocolate cookies in a food processor (or in a zip-top bag with a rolling pin) until fine. Combine with melted unsalted butter and cocoa powder in a mixing bowl. Press the mixture firmly into the bottom of a lined 9-inch springform pan, creating an even layer. Chill in the fridge for at least 15 minutes to set the crust while you prepare the other elements.
Step 2: Simmer the Cherry Sauce
Pit fresh sweet cherries until you have two cups (reserve a few stemmed cherries for the final garnish). Place pitted cherries in a small saucepan with 1/2 cup granulated sugar and lemon juice; simmer over medium heat, stirring occasionally, just until cherries are softened and juices are released, about 7-10 minutes. Mix cornstarch with a little water, then stir into the cherry mixture to thicken. Once glossy and viscous, remove from the heat and cool completely.
Step 3: Make the Cheesecake Filling
In a large bowl, beat softened cream cheese and remaining sugar until smooth and fluffy. Add sour cream, eggs (one at a time), vanilla extract, and salt. Beat until fully combined and creamy, taking care not to overmix. Gently fold in cooled melted chocolate chips and heavy whipping cream using a spatula to maintain a creamy texture. The mixture should be uniform and silky, ready to pour.
Step 4: Assemble Cheesecake Layers
Spread half the cheesecake filling evenly over the chilled crust. Spoon most of the cooled cherry sauce (reserve a few tablespoons for topping) in dollops over the filling, swirling gently with a knife or toothpick for a marbled effect. Layer the rest of the cheesecake batter on top, smoothing with an offset spatula for a neat finish.
Step 5: Bake to Perfection
Preheat the oven to 325°F (163°C). Place the cheesecake in the oven, using a water bath if desired for minimal cracks. Bake for 55-65 minutes, or until the center jiggles just slightly when tapped. Turn off the oven, leaving the cheesecake inside for 1 hour to gradually cool—this helps prevent surface cracks and creates that creamy texture showcased in the photo.
Step 6: Chill and Set
Remove cheesecake from the oven and cool to room temperature. Transfer to the refrigerator and chill for at least 4 hours (or overnight) to set completely. This step develops the flavors and ensures clean, beautiful slices.
Step 7: Add Final Garnishes
When ready to serve, run a knife around the cheesecake’s edge and gently release the springform pan. Pour the reserved cherry sauce over the top, letting it naturally drip down the creamy sides. Garnish generously with fresh, stemmed cherries and a handful of dark chocolate shavings. Admire the contrasting colors—deep red, glossy cherries against velvety cheesecake and chocolate base—then slice and serve.
Serving Suggestions
Chocolate Cherry Cheesecake isn’t just another dessert—it’s a celebration centerpiece. Present each slice with:
- A generous drizzle of warm cherry sauce for extra moisture and color.
- A dollop of fresh whipped cream on the side for added lightness.
- Extra chocolate shavings or curls that mimic the elegant look in the finished photo.
- Fresh cherries, with stems for a dramatic finishing touch.
- A sprig of mint for vibrant green contrast.
- Serve chilled for a firm, creamy texture or allow it to sit at room temperature for 15 minutes before serving for a softer, mousse-like effect.
Pair each slice with hot espresso, rich black tea, or a glass of ruby port for an adult twist. For a brunch or afternoon gathering, try serving alongside fresh berries or a light fruit salad.
Pro Tips & Tricks
- For smooth, crack-free cheesecake: Always use room-temperature cream cheese and eggs. Mix on medium speed and avoid overmixing after eggs are added to keep the filling velvety.
- A water bath helps regulate heat and prevent cracks, but isn’t strictly necessary if the oven temperature is well-managed and gentle cooling is practiced.
- Let the cheesecake chill overnight to develop the most complex flavors and achieve bakery-quality texture.
- Use a hot, sharp knife dipped in warm water for clean slices—wipe between cuts!
- To achieve the irresistible glossy cherry topping seen in the visual, don’t rush the thickening of the cherry sauce. Let it become syrupy and vibrant, and save some for dramatic drizzling right before serving.
- For picture-perfect presentation, arrange stemmed cherries and chocolate shavings on top just before serving so they look fresh and enticing.
- If using frozen cherries, thaw and drain them thoroughly to prevent excess moisture from affecting the filling or the sauce’s texture.
- Want to save time? Prepare the crust, filling, and sauce in advance—then assemble and garnish on the day of your event.
How to Store Chocolate Cherry Cheesecake
Proper storage guarantees that every bite of leftover Chocolate Cherry Cheesecake is as luscious as the first:
- Store the cheesecake (ungarnished) tightly wrapped or in an airtight container in the refrigerator for up to 5 days.
- After adding garnishes and sauce, consume within 2-3 days for peak texture and flavor.
- For longer storage, freeze individual, ungarnished slices: place them on a parchment-lined tray until firm, then wrap tightly in plastic wrap and foil. Store in a freezer bag for up to 2 months. Thaw overnight in the refrigerator, then add cherry sauce and garnishes before serving.
- Avoid storing with garnishes, as fresh cherries and chocolate shavings can wilt or lose texture. Always add toppings just before serving for maximum visual and flavor impact.
General Information
Chocolate Cherry Cheesecake is beloved worldwide for its rich flavor profile and elegant look. This dessert typically serves 12-14, making it perfect for gatherings and celebrations. The combination of tangy cream cheese and sour cream with deep chocolate and sweet cherries offers a luxurious taste experience that appeals to all ages.
The visual elements—from the pop of glossy red cherries to velvety white cheesecake and dark crust—make it a true showstopper. It’s a wonderful option for holidays, birthdays, and romantic evenings, and it’s often requested for Valentine’s Day, anniversaries, or any time you want to impress your loved ones.
Seasonality can affect ingredient choices, but the cheesecake adapts beautifully to fresh, frozen, or even canned fruit. It’s a manageable bake for home cooks, with make-ahead potential and rave-worthy results.
FAQs
Is it okay to use frozen cherries for the filling?
Absolutely! Frozen cherries work well when fresh aren’t available. Thaw and drain them thoroughly to avoid watering down your filling or sauce.
Can I make Chocolate Cherry Cheesecake gluten-free?
Yes—just substitute certified gluten-free chocolate cookies or graham crackers for the crust. Double-check any other packaged ingredients for gluten content.
How do I prevent cheesecake from cracking?
Ensure all dairy ingredients are at room temperature, mix gently once eggs are added, bake low and slow, and let the cheesecake cool gradually in the oven before chilling.
Can I skip the water bath?
You can, though a water bath helps achieve a smoother top. If skipping, bake at a consistent low temperature and avoid overbaking.
Can I freeze leftover cheesecake?
Yes! Freeze plain (ungarnished) slices wrapped well for up to two months. Thaw in the fridge overnight and add cherry topping before serving.
What is the best way to slice cheesecake cleanly?
Dip a sharp knife in hot water, wipe it dry, and slice. Clean the knife between cuts for neat, beautiful slices.
Conclusion
Chocolate Cherry Cheesecake is more than a dessert—it’s an experience! Each slice offers a perfect harmony of rich, creamy, and tangy, topped with glistening cherries and chocolate for that “wow” factor. Whether you’re preparing it for a celebration, a holiday, or an everyday indulgence, this recipe ensures a gorgeous, crowd-pleasing result every time. Enjoy the baking process—and the even sweeter moment of sharing it with others.
Nutritional Information
While this Chocolate Cherry Cheesecake is truly decadent, being mindful of its nutritional content helps you enjoy every bite. Each slice (1/12) contains approximately:
- 435 calories
- 29g fat (16g saturated fat)
- 45g carbohydrates
- 4g protein
- 2g fiber
- 29g sugars
Keep in mind that ingredient swaps—like low-fat cream cheese, sugar alternatives, or nut-based crusts—may adjust these values. This show-stopping dessert is best enjoyed as a special treat, worth every delicious calorie for its celebration-worthy taste and beauty.
Print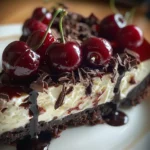
Chocolate Cherry Cheesecake
- Total Time: 6 hours
- Yield: 12
Description
Chocolate Cherry Cheesecake combines creamy cheesecake filling with a chocolate cookie crust and sweet cherry topping. Rich cocoa notes paired with the tartness of cherries create a balanced flavor, while a smooth, velvety texture contrasts perfectly with the crunchy, buttery base. Perfect for celebrations or a decadent dessert any night, this cheesecake is both visually stunning and delicious.
Ingredients
- 1 1/2 cups chocolate cookie crumbs
- 1/3 cup unsalted butter, melted
- 2 pounds cream cheese, softened
- 1 cup granulated sugar
- 1/4 cup unsweetened cocoa powder
- 3 large eggs
- 1 teaspoon vanilla extract
- 1 cup sour cream
- 1 1/2 cups cherry pie filling
- 1/2 cup dark chocolate chips, melted
Instructions
- Preheat the oven to 325°F (163°C). Grease a 9-inch springform pan.
- Mix chocolate cookie crumbs with melted butter. Press into the bottom of the pan to create the crust.
- Bake crust for 10 minutes; let cool while preparing the filling.
- In a large bowl, beat cream cheese and sugar until smooth.
- Blend in cocoa powder. Mix in eggs one at a time, then add vanilla extract.
- Fold in sour cream until just combined.
- Pour filling over cooled crust; smooth top. Bake for 55-65 minutes until set but slightly jiggly in the center.
- Turn off oven, crack the door, and let cheesecake cool inside for 1 hour.
- Chill in refrigerator at least 4 hours or overnight.
- Top with cherry pie filling and drizzle with melted chocolate before serving.
Notes
Substitute Greek yogurt for sour cream for a tangier flavor or use dairy-free cream cheese for a vegan version. Cookie crust can be made with graham crackers if needed. For make-ahead, prepare cheesecake a day in advance and add topping before serving. Store covered in the fridge for up to 5 days or freeze slices individually. If cracks develop, cover with cherries and chocolate. Overbeating can cause cracks, so mix gently.
- Prep Time: 20 minutes
- Cook Time: 1 hour 5 minutes
- Category: Dessert
- Method: Baking
- Cuisine: American