
Thank you so much for joining me here on this culinary adventure—right from the heart of my kitchen to yours! There’s something magical about honoring old-world techniques and savoring flavors passed down through generations, and with this Grouse Cheese Recipe, I promise you’re about to embark on a journey that’s as flavorful as it is enriching. Nothing ignites my passion for cooking quite like bringing a centuries-old cheesemaking tradition to life—especially when the result is a rustic wheel of cheese, dappled with natural molds, beckoning from the kitchen counter in all its golden, buttery glory.
Grouse cheese is not just food; it’s a living, breathing artifact of highland terroir, each bite bursting with the wild tang of fresh milk, subtle herbal notes from foraged rennet, and an aged complexity you simply can’t fake. If you’ve ever dreamed of crafting cheese that captures the spirit of the land and your own hands, you’re in the right place.
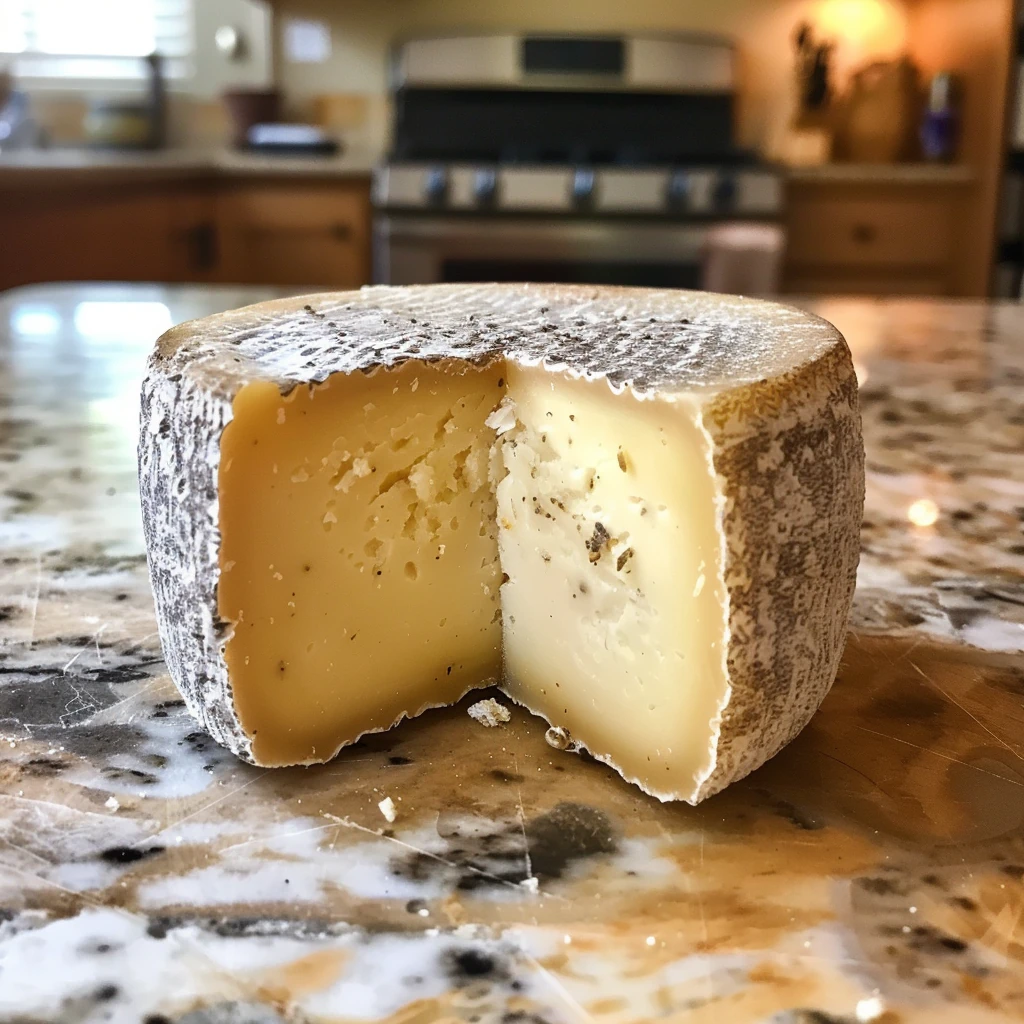
This step-by-step, approachable guide will transform you from curious cheese lover to home cheesemaker brimming with pride. And trust me—once you’ve seen that first wheel emerge, with its rustic rind and golden cross-section flecked with botanicals, you’ll be grinning ear to ear, just like I did the first time I tried it. So let’s roll up our sleeves and bring the taste of the highlands into your home—one glorious round of grouse cheese at a time!
Table of Contents
Why You’ll Love Grouse Cheese Recipe
- Echoes the romance of highland cheese traditions in every flavorful bite
- Uses simple, natural ingredients—no mystery powders or strange additives
- Achievable at home, even for absolute beginners, with straightforward tools
- Allows total customization from milk blend to herb-infused rind
- The finished wheel is a showstopper: rustic, aromatic, and beautifully aged
- Brings the nurturing ritual of slow food into your kitchen
- Encourages creativity for serving, pairing, and even gifting to friends!
Ingredients for Grouse Cheese Recipe
Let’s start with the essential ingredients for your own Grouse Cheese Recipe. While the ingredient list is blessedly short, each element brings an irreplaceable depth to the final cheese:
- Fresh raw sheep’s milk (4-6 liters, or a blend of sheep and goat milk for more complexity)
- The fresher, the better! Dawn milk is traditional, loaded with flavor and natural enzymes.
- Wild rennet (from dried nettle or cardoon thistle), or standard rennet
- Wild plant-based rennet imparts subtle earthy and herbal notes, making this cheese uniquely “of place.”
- Rock salt or sea salt
- Use the best quality you can source for pure, mineral-forward salting.
- Optional: crushed juniper berries or yarrow
- For an aromatic, gently bitter rind that hints at the highland’s wild bounty.
Each item plays an essential, flavorful role, contributing to the visual and textural beauty of your wheel. And trust me, when you cut into the finished cheese and see that creamy, straw-yellow heart with its natural rind, you’ll realize just how much love is packed into these simple ingredients.
Necessary Tools
To craft an authentic Grouse Cheese at home, you don’t need a high-tech lab—just honest equipment and a little patience. Here’s what you’ll want to gather:
- Large pot for gently heating the milk—preferably heavy-bottomed for even temperature.
- Fine muslin cloth or cheesecloth for filtering and draining.
- Cheese forms or molds. If you don’t have dedicated cheese molds, a colander lined with muslin will do in a pinch.
- Clean stones or kitchen-safe weights for pressing—the more rustic, the more authentic.
- Cheesecloth or muslin for wrapping the pressed cheese during aging.
- A cool, humid aging space. Think root cellar, wine fridge, or any environment between 50-55°F with enough moisture to nurture natural molds.
- Wooden shelves or boards for resting and aging the cheese.
Each of these tools, much like the ingredients, adds history and craft to your cheese. My own first attempt involved improvising with a clean river stone and an old vegetable crate—proof that cheesemaking rewards ingenuity!
Ingredient Additions & Substitutions
One of the magical things about the Grouse Cheese Recipe is how forgiving—and inviting—it is to thoughtful customization. Let’s dive into your options, whether you’re chasing tradition or adding a twist!
If you can’t source fresh, raw sheep’s milk, consider a combination of sheep and goat—or, for the more adventurous, a touch of cow’s milk to round out the flavor. While pasteurized milk works in a pinch (and is often a must for food safety), it may lack the layered flavors and wild flora that only fresh, raw milk can impart. Pro tip: Talk to local farmers; they’re often brimming with advice and pride for their products.
Rennet is another area for creativity and necessity. Wild nettle or cardoon thistle rennets lend an herbal tang and floral aroma unique to Old World cheeses. But commercial animal or vegetarian rennet is readily available and yields an excellent curd structure for beginners. Don’t stress if foraged rennet sounds intimidating—store-bought will still let you create a deeply satisfying cheese.
Salt, that unsung hero, deserves its own spotlight. I love using coarse sea salt or even Himalayan rock salt for a mineral-rich finish that complements the earthiness of the cheese. Regular table salt will do, but consider it a starting point—up your salt game for added flair!
Now for the finishing touches—the optional botanicals. Crushing juniper berries or yarrow into the rind gives your cheese a distinctive, piney, slightly bitter edge that’s singularly “highland.” Feel free to experiment: wild thyme, rosemary, or edible flowers can add regional character. And for the truly rustic, a rub of peat ash (yes, really!) pays homage to ancient preservation techniques.
Experimentation is not only encouraged—it’s celebrated. The Grouse Cheese Recipe is as much about expressing place and personality as it is about tradition. Whether you stick to the time-honored basics or invent your own local twist, the result will be delicious and uniquely yours.
How to Make Grouse Cheese Recipe
Making Grouse Cheese at home is a meditative, soul-satisfying process wrapped up in the aroma of warm milk, the tactile squeeze of curds, and the anticipation of aging. Don’t be intimidated by tradition—each step is approachable and magical in its simplicity. Let’s walk through the journey, from dawn milk to golden wheel.
Step 1: Milk Preparation
Begin just after sunrise—somehow, everything tastes fresher at dawn! Collect your raw sheep’s (or mixed) milk and, using a fine muslin cloth, hand-filter it to remove stray hay or any surprises from the barn. This simple step not only protects the final flavor, it’s like a quiet meditation, connecting you to generations of cheesemakers.
The secret to Grouse Cheese’s terroir is using the milk while it’s still tepid from the animal, never chilled. Those living microflora are the secret sauce for developing complex flavors later during aging!
Step 2: Curdling
Gently warm the milk to room temperature—not too hot, as that’ll scald the subtleties out of your cheese. Sprinkle in your rennet—wild or store-bought—following package instructions. Give the mixture a careful stir, then set it aside in a cool place and let patience do its work.
Over 8-12 hours, the magic happens. In this slow, gentle process, the milk solidifies into a delicate curd, with a fresh, yogurty aroma filling your kitchen. Every time I sneak a peek, I marvel at how this elemental shift happens with such little intervention.
Step 3: Cutting and Draining
When the curd is set, it should have the quiver of a poached egg—firm, yet yielding. Gently cut the curd into small cubes with a long knife or your scrupulously clean hands. As you do, whey will separate out in aromatic streams. Savor that scent: tangy, grassy, a promise of the cheese to come.
Let the curds rest as the whey drains off—save that flavorful liquid, as it’s your best friend for brining the cheese later.
Step 4: Pressing
Line your chosen cheese forms with muslin or cheesecloth and ladle the delicate curds in, working gently to avoid squashing the structure you’ve cultivated. Place a clean stone or other weights atop the forms and let gravity do its magic: pressing out more whey and giving your wheel that satisfyingly dense structure seen in traditional Grouse Cheese.
Turn the pressed cheese once and let it sit for 12 to 24 hours. As the cheese consolidates, a pale lemony yellow color develops—a nod to the sunny pastures that fed the sheep.
Step 5: Brining and Salting
Here comes the flavor and preservation punch! Remove the cheese from its form and choose your journey: either soak the wheel in your reserved whey-brine for 2 to 4 hours for a classic, well-rounded salting—or rub it thoroughly with crystalline rock salt for an exterior that crackles with flavor.
Are you feeling adventurous? Rub crushed juniper berries or yarrow into the rind, breathing even more highland magic into your cheese.
Step 6: Aging
Wrap your cheese gently in cheesecloth and nestle it atop wooden shelves in your cool, damp cellar space (or a dedicated cheese fridge, if modern convenience is more your speed). For the first week, flip the cheese each day to ensure even moisture and rind development. Afterward, weekly turning keeps the wheels aging beautifully.
Three months yields a young, elastic cheese with grassy, milky notes. If you can resist the temptation, keep your wheel aging for up to 12-18 months—the result is a dense, complex, powerfully flavored masterpiece that would make any highlander proud!
Step 7: Maintenance During Aging
Check your cheese regularly. Natural molds—those beautiful blue-grey blooms you see on your finished wheel’s rind—are part of the traditional character, not something to fear. If you like, brush the rind to manage texture, or rub it with peat ash for a nod to tradition.
Variable mold patterns, the occasional fleck of yarrow, and a slightly rough, golden crust—you’ll know your grouse cheese is developing those sought-after artisanal characteristics. The anticipation is half the fun!
Serving Suggestions
Serving Grouse Cheese is a moment to revel in your hard work! That beautiful wheel, with its dappled grey rind and buttery, sunlit interior, deserves a canvas worthy of its craftsmanship. Place it at the center of a rustic wooden board, surrounded by wedges sliced to reveal its creamy, close-knit crumb. I like to accompany it with slices of crusty country bread, a drizzle of local honey, and a scattering of foraged nuts or tart apple slices. The herbal scent of juniper or yarrow on the rind adds a wild dimension—try it alongside smoked meats, or atop roasted vegetables for an unforgettable savory note.
For formal occasions, a wedge paired with a highland single malt or a floral white wine is pure perfection. Don’t be afraid to get creative and use crumbled Grouse Cheese atop fresh salads or pasta—even stirred into creamy polenta, it brings farmhouse authenticity to any dish.
For appetizers, pair your grouse cheese with cranberry feta pinwheels or serve alongside cheese bread
Pro Tips & Tricks
Achieving cheesemaking perfection at home is a blend of confidence, patience, and a little insider know-how:
- Use milk as fresh as possible; if you have to buy, try to source it from a local dairy for peak flavor.
- Don’t rush the curdling or aging process—slow transformation means more complex, satisfying flavors.
- Weigh your curds gently; pressing too hard early on can create a dense, rubbery cheese.
- Never be afraid of natural molds on the rind! These are crucial for both protection and flavor.
- For home cheesemakers, an old mini fridge can be converted into a cheese cave with an inexpensive humidity controller.
- Jardinière-style additions (blending fresh herbs or edible flowers directly into the curd) are a whimsical way to make each wheel unique.
- Always keep detailed notes—you’ll be surprised how much the seasons and your techniques influence each batch!
Cheesemaking rewards both intuition and experimentation, so don’t fret about making everything perfect. Each wheel is a snapshot of your environment, skill, and inspiration.
How to Store Grouse Cheese
Storing Grouse Cheese thoughtfully ensures your hard work is rewarded:
- After aging, store your wheel wrapped in cheese paper or cloth in the fridge or your dedicated cool space.
- Avoid plastic wrap—it traps moisture and mutes those beautiful rinds.
- Young cheese (under 6 months) will keep for several weeks when properly wrapped and refrigerated.
- Older, reserve wheels last months, even improving in depth with continued slow aging.
- If mold appears on a cut surface during storage, simply trim and enjoy—the interior remains fresh and safe.
- For maximum flavor, allow cheese wedges to come to room temperature before serving.
With these care steps, you ensure every bite tastes just as vibrant and nuanced as the day your cheese emerged from the press.
General Information
Grouse Cheese, at its heart, is a celebration of traditional highland craft—each wheel a living reflection of pasture, climate, and care. While the roots of the recipe trace back centuries, home cheesemakers worldwide are reimagining its place at the table. This cheese’s rustic, natural rind and straw-gold center, flecked with botanicals or covered with a bloom of wildflower molds, make it both a showstopper and a deeply personal project.
The aging process is key: young wheels are mild and elastic, perfect for melting and snacking. Extended aging reveals sharper, earthy flavors and a crumbly, granular texture beloved by cheese aficionados. In highland communities, Grouse Cheese is celebrated at both feasts and family tables, prized for its rich, lingering finish and ability to capture the local terroir. Whether you’re honoring tradition or writing your own cheese tale, Grouse Cheese deserves a place in your kitchen—and your heart.
FAQs
Is it safe to use raw milk in the Grouse Cheese Recipe?
If your milk source is local and trustworthy (ideally from a farm that adheres to strict cleanliness), raw milk will produce the most flavorful and complex cheese. If in doubt, opt for high-quality pasteurized milk.
Can I use commercial rennet instead of wild rennet?
Absolutely! While wild rennet imparts unique botanical notes, commercial animal or vegetable rennet creates a firm curd and is easier to source for most home cheesemakers.
What’s the best way to mimic a traditional aging environment at home?
A wine refrigerator or converted mini fridge with a humidity controller is perfect for home cheesemaking, allowing you to control both temperature and humidity for optimal aging.
How do I know when my Grouse Cheese is ready to eat?
For the young, elastic version, three months of aging is sufficient. For more complexity and a firmer texture, wait six months or longer. The rind will become drier and the interior more crumbly as the cheese matures.
What should I do if blue or gray mold grows on the rind?
This is a natural and normal part of traditional cheesemaking—simply brush or wipe it off as needed during aging. Mold helps develop flavor and protects the cheese!
Can I make a smaller batch of Grouse Cheese Recipe?
Yes, you absolutely can! Simply halve the ingredients and use a smaller mold or colander—yield will be roughly one pound per gallon of milk.
Can I freeze Grouse Cheese?
While possible, freezing may alter the texture, especially in young wheels. If you must freeze a wedge, wrap it tightly and expect some loss in creaminess.
Is Grouse Cheese vegetarian?
If made with vegetarian rennet, yes. Wild nettle or cardoon rennet is plant-based and perfect for vegetarian diets.
Conclusion
If you’ve made it this far, thank you for joining me on the journey through the Grouse Cheese Recipe! Taking on this traditional highland masterpiece is a true act of culinary care—one I can’t recommend enough. From that first curd formation to the patient anticipation of aging, every step celebrates the art of slow food and heritage techniques. And best of all, the finished cheese, with its rustic rind and creamy-gold heart, is cause for pride and endless sharing. I can’t wait for you to experience the joy (and bragging rights!) of serving your own homemade Grouse Cheese to family and friends. Happy cheesemaking!
Nutritional Information
Grouse Cheese, like most traditional hard cheeses, is a concentrated form of dairy goodness. Each ounce typically contains:
- Protein: High, thanks to the dense curd structure—expect 6–8g per ounce.
- Fat: 7–9g per ounce, depending on your milk source; this brings both richness and satiety.
- Carbohydrates: Very low, usually less than 1g per ounce.
- Vitamins & Minerals: Excellent source of calcium, vitamin A, and beneficial fatty acids; the golden color hints at pasture-fed nutrients and beta-carotene.
- Sodium: Moderately high due to brining and salting—taste and adjust as needed for dietary requirements.
As with any artisanal cheese, Grouse Cheese is rich and should be enjoyed in moderation. Each bite packs a punch of flavor, energy, and the healthful benefits of fermented dairy, especially if made with grass-fed milk. Don’t be surprised if this cheese quickly becomes your go-to for snacks, pairings, and unforgettable gatherings—its balanced nutrition and complex character make it a standout on any cheese board!
PrintGrouse Cheese Recipe – Traditional Raw Sheep’s Milk Cheese
- Total Time: 3 months minimum (including aging)
- Yield: Varies; yields about 1 pound per gallon of milk
Description
Grouse Cheese is a traditional, raw-milk cheese crafted from fresh sheep’s or mixed sheep and goat milk, using wild or standard rennet, and carefully aged to yield unique local flavors. Following time-honored highland techniques, this artisanal process includes gentle hand-filtration, natural curdling, and pressing, culminating in complex, terroir-driven wheels that mature beautifully over months.
Ingredients
- 4–6 liters fresh raw sheep’s milk (or mixed sheep and goat milk)
- Wild rennet (from dried nettle or cardoon thistle), or standard rennet as substitute (as needed per package directions)
- Rock salt or sea salt
- Optional: crushed juniper berries or yarrow for flavoring
Instructions
- Collect fresh milk at dawn and hand-filter through a fine cloth to remove impurities. Use immediately without chilling.
- Gently warm milk to room temperature in a large pot. Add rennet (wild or standard) as per package instructions. Allow to coagulate for 8-12 hours until a firm curd forms.
- Cut the curds by hand into small pieces and allow the whey to separate naturally. Drain off excess whey and reserve for possible brining.
- Line cheese forms with muslin, transfer curds, and press with weights (clean stones) for 12-24 hours, turning cheese once during pressing.
- Remove the cheese from the molds. Soak in whey-brine for 2-4 hours or rub thoroughly with salt. For flavor, optionally rub with crushed juniper or yarrow.
- Wrap cheese in cheesecloth and place on wooden shelves in a cool (50–55°F), humid environment. Turn cheese daily for a week, then weekly. Age a minimum of 3 months for young cheese or 12+ months for reserve.
- During aging, inspect regularly for mold development, brush or rub the rind as needed, and optionally finish with peat ash for a traditional touch.
Notes
Substitute wild rennet with standard commercial rennet; goat milk can be blended with sheep’s milk for a different profile. If raw milk is unavailable or unsafe, pasteurized can be used, but flavor will vary. Aging at consistent cool, humid temps is crucial—dedicated cheese fridges can replicate cellar conditions. If curds are too soft, check milk freshness and dosage of rennet. Salt thoroughly to avoid blandness. Store wrapped cheese wheels in waxed or vacuum-sealed paper after aging. Small (1-2 liter) batches are perfect for beginners. If excessive unwanted mold forms, gently brush off and ensure proper airflow. Home cheesemakers must maintain strict cleanliness throughout the process to prevent spoilage.
- Prep Time: 12 hours
- Cook Time: 24 hours (primarily pressing and aging setup)
- Category: Cheese
- Method: Culturing, Pressing, and Aging
- Cuisine: Traditional Highland (European)