
Welcome to a warm and delightful treat with The Best Mini Pumpkin Pies that bring joy to every bite. These charming pies offer a comforting feast for your senses with their rich, velvety filling and buttery crusts, sure to make you feel jubilant and satisfied. If you love these, you’ll also enjoy our 18 Delightful Cozy Easy Bisquick Pumpkin Donut Holes that share that same thrilling pumpkin spice spirit.
Why You’ll Love The Best Mini Pumpkin Pies
- Absolutely amazing flavor from a perfectly spiced filling
- Happy, festive size great for parties or cozy gatherings
- Simple to create with easy-to-find ingredients you cherish
- Ready in 48 minutes, making your cozy baking experience quick
Ingredients for The Best Mini Pumpkin Pies
The secret to these mini pumpkin pies’ magic lies in the blend of carefully chosen ingredients. The crisp and flaky unbaked pie crusts form a sturdy yet tender vessel embracing the luscious pumpkin filling. The filling combines smooth canned pumpkin puree with melty evaporated milk, sweetened with brown and granulated sugar for a delightful rich sweetness. A dash of fragrant pumpkin pie spice and a pinch of salt intrigue your palate, while a touch of vanilla extract deepens the aroma. The lightly beaten egg acts as a binder to create that impressive, velvety texture you’ll adore. Finally, top these pies with luscious homemade whipped cream to heighten the sensory experience of this joyful creation.
Necessary Tools
- Reliable muffin pan to shape your mini pies perfectly
- A 3 1/2-inch cutter for crafting flawless pie crust circles
- Mixing bowl and whisk to create that smooth filling blend
- Rolling pin to evenly roll out the pie crusts
Using the right tools is crucial to unlocking the full potential of this recipe. The muffin pan holds your mini pie crusts securely, ensuring each pie bakes evenly with delightfully golden edges. The precise 3 1/2-inch cutter is essential for uniform sizes that look captivating when served. A sturdy rolling pin ensures your crusts roll out simply and evenly — no stress, only satisfying dough that’s ready to embrace the filling. With your mixing bowl and whisk, you build that creamy, perfectly blended pumpkin filling that brings this recipe alive. These tools empower your confidence and ease in creating the happiest mini pumpkin pies around.
Ingredient Additions & Substitutions
You can customize these mini pumpkin pies to match your cravings or pantry staples while keeping their fantastic taste. For an even more indulgent experience, add a handful of finely chopped toasted pecans or walnuts to the filling for a nutty crunch. If you prefer a touch lighter, substitute evaporated milk with coconut milk or almond milk for a mild twist with an exotic flair. Feel free to replace the brown sugar with coconut sugar for a less refined alternative that brings a subtle caramel note. For those who want a spicier sensation, increase the pumpkin pie spice or add a pinch of ground ginger or cloves. Alternatively, swap the homemade whipped cream topping for a dollop of mascarpone or cream cheese frosting for a luxurious finish that’s both creamy and tangy. This recipe’s versatility ensures you can craft a superb dessert that mirrors your unique, jubilant taste.
How to Make The Best Mini Pumpkin Pies
Creating these mini pumpkin pies is a thrilling journey that fills your kitchen with inviting aromas and creates a sense of accomplishment. From preparing the tender crusts to the velvety, spiced pumpkin filling and the golden bake, every step ignites your passion for baking and culminates in a dessert that delivers pure joy in every bite.
Step 1: Preheat and Prepare
Begin by preheating your oven to 400°F to set the stage for a golden, delicious bake. As the oven warms, roll out your pie crusts to an even 1/8-inch thickness, setting the foundation for your mini pies’ crispy, flaky base.
Step 2: Cut and Shape with Care
Using the 3 1/2-inch cutter, carefully cut 18 uniform circles from your rolled-out dough. Gently press each circle into the cups of your muffin pan, creating neat pie shells ready to cradle the luscious filling. Chill the crust-lined pan in the refrigerator to firm up the dough before filling.
Step 3: Whisk a Smooth Filling
In a bowl, combine the brown sugar, granulated sugar, pumpkin pie spice, and salt to form a fragrant spice blend. Stir in the canned pumpkin puree, evaporated milk, beaten egg, and vanilla extract. Whisk until your filling is smooth, silky, and perfectly harmonious.
Step 4: Fill and Bake to Perfection
Take your chilled muffin pans from the refrigerator and spoon about 2 tablespoons of the pumpkin mixture into each pie crust, filling them neatly and evenly. Place the pans in the oven and bake for 16 to 20 minutes until the filling is set, and the edges of the crust are gloriously golden.
Step 5: Cool, Chill, and Finish with Whipped Cream
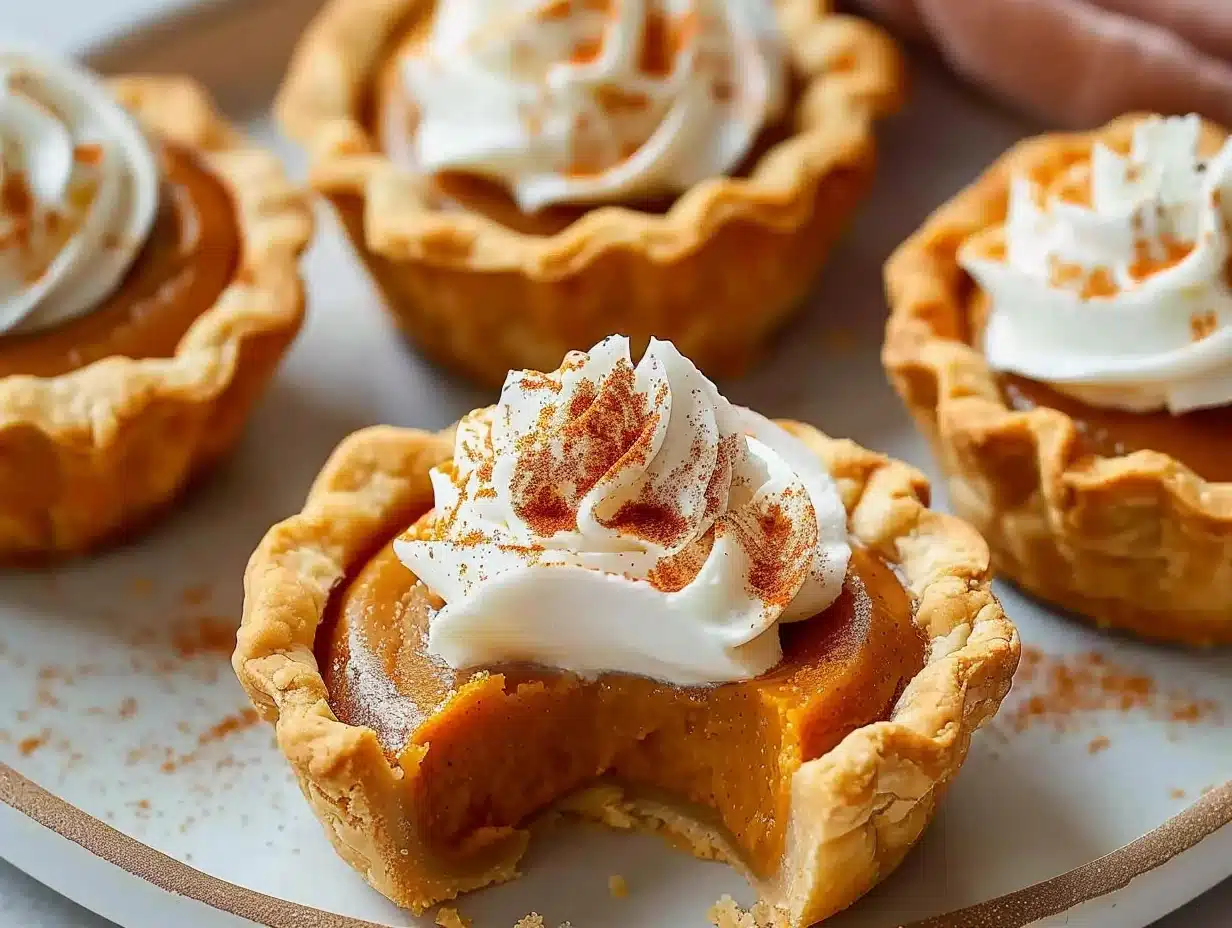
Remove your mini pies from the oven and cool them on a wire rack for 30 minutes, allowing them to set beautifully. Once cooled, remove the pies from the muffin pan and chill them for at least 3 hours. Serve topped generously with homemade whipped cream to complete this sensational dessert experience.
How to Serve The Best Mini Pumpkin Pies
These mini pumpkin pies shine brightest when shared among friends and family, evoking happiness with every bite. Present them on a beautiful serving platter, garnished with a sprinkle of cinnamon or nutmeg atop the whipped cream for an irresistible visual treat. Pair them with a steaming cup of coffee or hot spiced tea to complement the rich, sweet flavors. This cozy dessert transforms any gathering into a spirited celebration, promising smiles and happy memories that last long after the last crumb is enjoyed.
Pro Tips & Tricks
For sensational results, roll your pie crusts between two sheets of parchment paper to prevent sticking and ease cleanup. Chilling the crusts in the muffin pan before filling helps prevent shrinking and creates a sturdier shell. When mixing the filling, whisk vigorously to ensure a smooth texture without lumps for that heavenly consistency. Avoid over-baking; the pies should be just set but still slightly jiggly in the center to achieve a luscious mouthfeel. Wrap leftovers tightly and keep refrigerated to maintain freshness. If you want to impress even more, experiment with topping these pies with a drizzle of caramel sauce or a sprinkle of toasted pecans for a tempting crunch. These tips unleash the best in your pumpkin pie baking endeavors.
Storage Instructions
Store your mini pumpkin pies in an airtight container in the refrigerator to keep them fresh and delightful for up to four days. Before serving chilled pies, bring them to room temperature or warm slightly for a more inviting taste. You can also freeze the unbaked mini pies; freeze them flat on a baking sheet, then transfer to a freezer-safe bag for up to a month. When ready, bake from frozen, adding a few extra minutes to the baking time. Proper storage preserves the vibrant flavors and textures, so you can savor these joyful pies again and again.
General Information
The Best Mini Pumpkin Pies capture the essence of autumn’s bounty in perfectly portioned delights. These pies elevate any occasion with their vivid orange filling and fragrant spices, emphasizing seasonal joy and celebration. Their compact size makes them ideal for sharing or for when you want a delightful dessert without overindulgence. This recipe blends tradition with convenience, delivering consistently outstanding results. Whether for holidays, casual gatherings, or a simple treat, these mini pumpkin pies never fail to impress with their remarkable balance of flavor, texture, and festive appeal.
FAQs
Can I make the pie crust from scratch?
Absolutely! While using store-bought pie crusts keeps this recipe simple and fast, making your own flaky pie crust from scratch can add a wonderful homemade touch. Use cold butter and chill the dough well for the best results in texture and flavor.
How long will these mini pies keep in the fridge?
Stored in an airtight container, these mini pumpkin pies stay fresh and delicious for up to four days. Make sure to refrigerate them promptly after baking and cooling to maintain their texture and flavor.
Can I substitute the pumpkin pie spice?
You can create your own blend with ground cinnamon, ginger, nutmeg, and cloves, or simply increase the cinnamon for a warm spicy note. Adjust according to your taste preferences to make each pie uniquely yours.
What to Serve With The Best Mini Pumpkin Pies
Complement your mini pumpkin pies with dishes that enhance their spectacular, warm flavors. A rich vanilla bean ice cream or a scoop of creamy mascarpone pairs beautifully with the spiced pumpkin, creating a harmonious taste experience. Fresh roasted nuts or a vibrant autumn salad with crisp greens and dried cranberries add contrast and freshness to the meal. For a beverage pairing, consider warm apple cider or a spiced chai latte to amplify that cozy, jubilant ambiance. For more cozy pumpkin treats, don’t miss our 6 Amazing Happy Homemade Blackberry Cobbler Ideas.
Conclusion
These mini pumpkin pies bring amazing warmth and happiness to your table with their scrumptious flavor and charming presentation. Perfect for sharing and making memories, they truly represent joy in every bite. Whether a festive occasion or a cozy treat, savor every mouthful of this wonderful recipe.
Nutritional Information
These mini pumpkin pies provide a delightful treat with balanced nutrition from wholesome pumpkin puree rich in vitamins and fiber. While delivering satisfying flavor, they maintain moderate calories per serving, making them a positive addition to your festive menu. Enjoy these pies mindfully and relish their inviting, nourishing qualities.
Print
Best Mini Pumpkin Pies
- Total Time: 3 hours 48 minutes
- Yield: 18 mini pies
Description
This recipe for the Best Mini Pumpkin Pies features a smooth, spiced pumpkin filling nestled in crisp, flaky 3.5-inch pie crusts, baked perfectly to a golden finish. These bite-sized pies are ideal for holiday gatherings or anytime dessert cravings, combining classic pumpkin pie flavors with convenient, individual servings.
Ingredients
- 2 9-inch unbaked pie crusts
- 1/3 cup brown sugar
- 2 tablespoons granulated sugar
- 1 1/2 teaspoons pumpkin pie spice
- 1/4 teaspoon salt
- 1 cup canned pumpkin puree
- 3/4 cup evaporated milk
- 1 large egg, lightly beaten
- 1/2 teaspoon vanilla extract
- Homemade whipped cream for topping
Instructions
- Preheat oven to 400°F.
- Roll out pie crusts to 1/8-inch thickness and cut 18 circles using a 3 1/2-inch cutter.
- Press each circle into the cups of a muffin pan and refrigerate.
- In a bowl, mix together brown sugar, granulated sugar, pumpkin pie spice, and salt.
- Add pumpkin puree, evaporated milk, beaten egg, and vanilla extract. Whisk until smooth.
- Remove muffin pans from refrigerator and spoon 2 tablespoons of filling into each crust.
- Bake for 16 to 20 minutes until filling is set and crusts are golden.
- Cool on a wire rack for 30 minutes, then remove mini pies from pans.
- Chill for at least 3 hours before serving. Top with homemade whipped cream.
Notes
Substitute evaporated milk with coconut milk or regular milk if needed. Use store-bought whipped cream if preferred. Make ahead by baking and chilling pies; keep refrigerated up to 2 days. If crust gets soggy, bake a few minutes longer to firm edges. Avoid overfilling to prevent spillage. Use a sharp cutter for clean crust circles.
- Prep Time: 30 minutes
- Cook Time: 18 minutes
- Category: Dessert
- Method: Baking
- Cuisine: American